Search

Content

0 comments

*not-at-all-halal chicken and rice.

DSC_2904

Recently someone very dear to me challenged me to make an effort to do only one thing at a time. (I say "dear to me" because people who know me well know that the shortest distance between me and an idea I'm not particularly fond of is a challenge.) The idea is this:

When you're watching TV, watch TV (no computer, no phone, no hopping up every five seconds to wash a dish or get a snack or examine your eyebrows in the bathroom).

When you're driving the car, drive the car (no listening to the radio, no checking your text messages at red lights).

When you're writing, write.

When you're talking, talk.

When you're cooking, cook.

Simple, no?

No. This is tough stuff, friends! I make my living, as I suspect most people do, through a great deal of multitasking. So multitasking begins to mean productivity, and then productivity begins to determine just which column your day can fall into: How many things did I do today? 36 things! Good day. 32 things! Tsk, tsk. Do more!

It requires real effort to do less, I find. It is contradictory but true that there can be comfort in a restless mind. (And I miss my NPR, I do.)

But a person can learn a lot about herself in the ensuing quiet, and in the attempts—however futile—at stillness. Even if that thing is namely that she is not very good at being quiet and still.

It stands to reason that doing one thing at a time will mean that you genuinely do that thing—writing, driving, cooking—better than you would otherwise do it. There is no question that quality suffers at the hand of quantity.

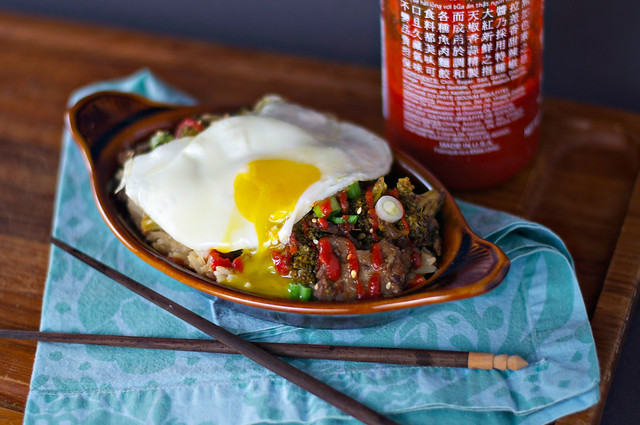
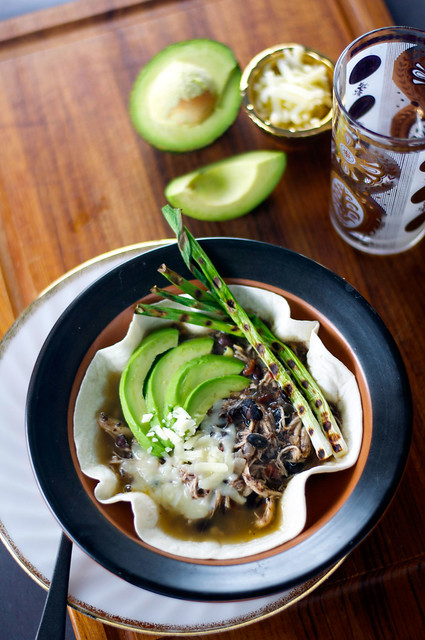
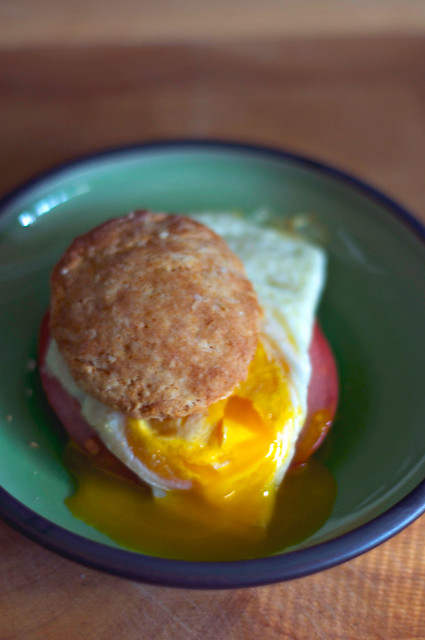
And yet this dinner, prepared in the peaceful calm of just me, just my kitchen, no distractions, was a complete failure of most of the things that would normally fall under the heading of success, where recipes are concerned: I had none of the proper ingredients, I did everything in the wrong order, and I wound up with something altogether foreign to what this is supposed to be ... at 9 p.m.

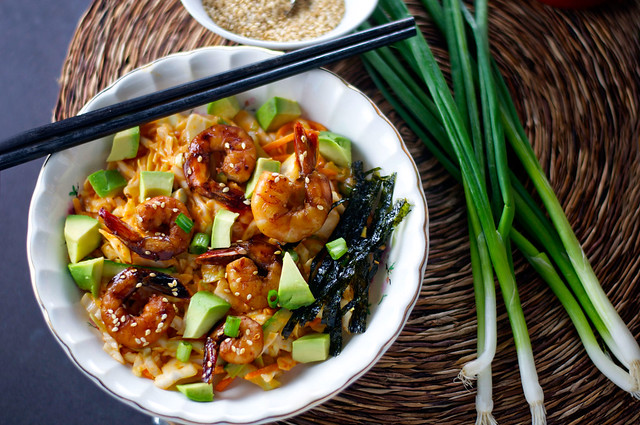
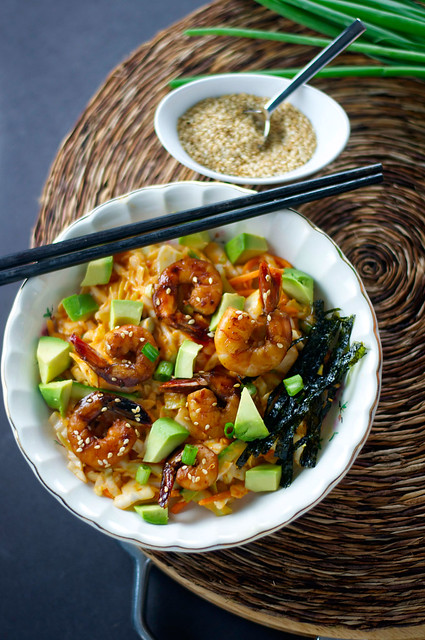
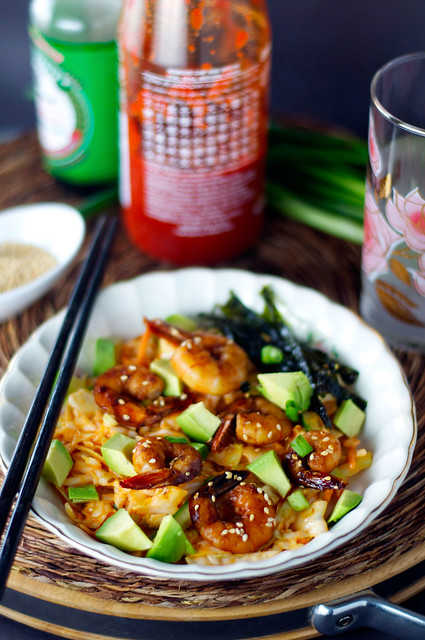
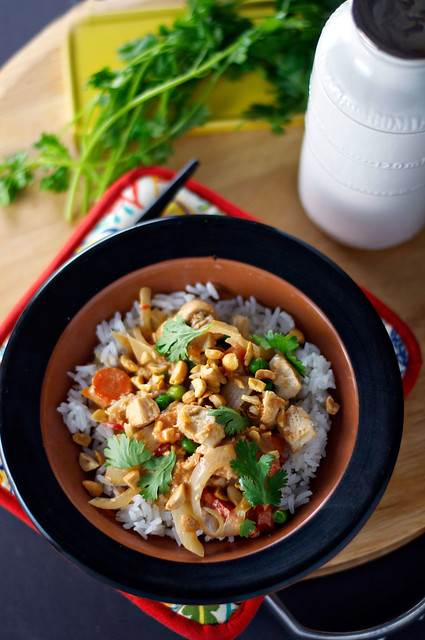
LOOSELY* speaking (*so, so loosely), this was an attempt to re-create this.

I've never eaten at a New York halal cart, but I'd read enough about it on the World Wide Web to hope that it would approximate the late-night food of indeterminate Middle Eastern origin that I loved so much in college.

I was in trouble almost from the word go. Or from the word halal. For one thing, here's what halal means, according to Wikipedia:

Halal foods are foods that Muslims are allowed to eat or drink under Islamic Shariʻah. The criteria specify both what foods are allowed, and how the food must be prepared. The food must come from a supplier that uses halal practices. Specifically, the slaughter must be performed by a Muslim.

Yeah, I'm fairly certain that's not happening at my Winn-Dixie. So I'm loath to put the word halal anywhere near this dish, lest I offend people who genuinely eat according to religious strictures. This is not that, is what I'm saying.

Winn-Dixie caused further problems by selling no boneless, skinless chicken thighs. And the bony, skinny chicken thighs they had looked ... suspect. Sigh. Boness, skinless breasts it would have to be.

For the sauce, white vinegar! I have that at home.

No I don't. White wine vinegar it would have to be.

Iceberg lettuce? All I have is Romaine. Harissa? Nowhere to be found in my market. Pocketless pita bread? Oops, forgot that entirely.

Once I got home with my rag-tag bunch of ingredients-that-were-not-quite-the-right-ingredients, I embarked on a completely flawed effort to do things according to the recipe. It turns out that a) I am really very rusty when it comes to following instructions, and b) my reading comprehension needs work.

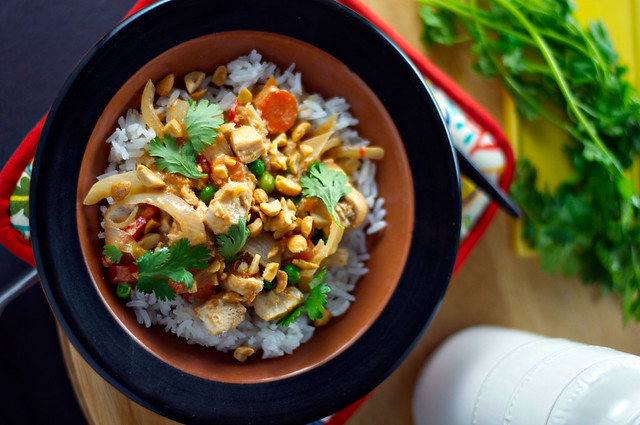
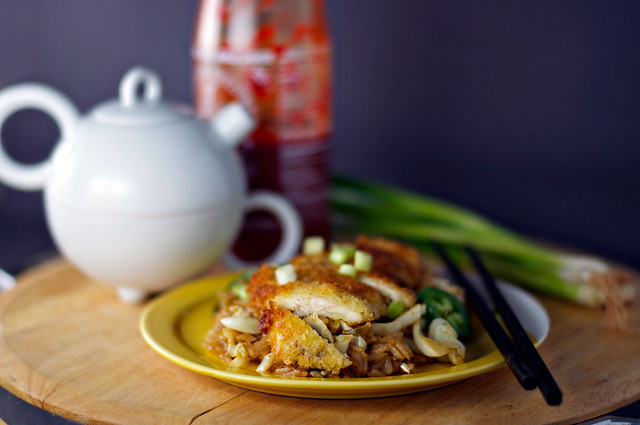
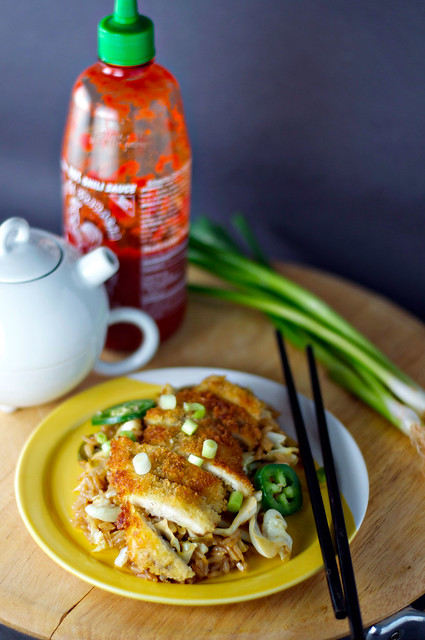
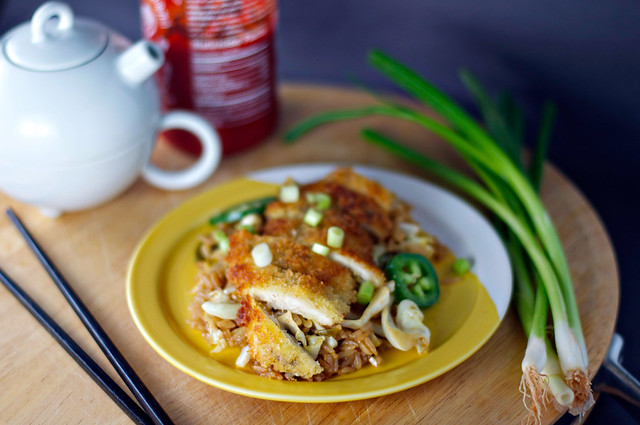
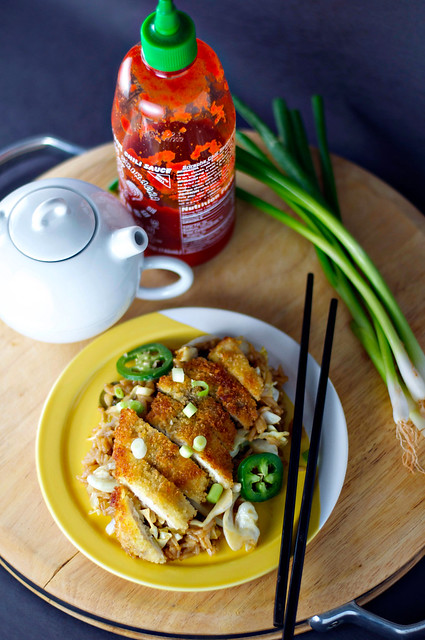
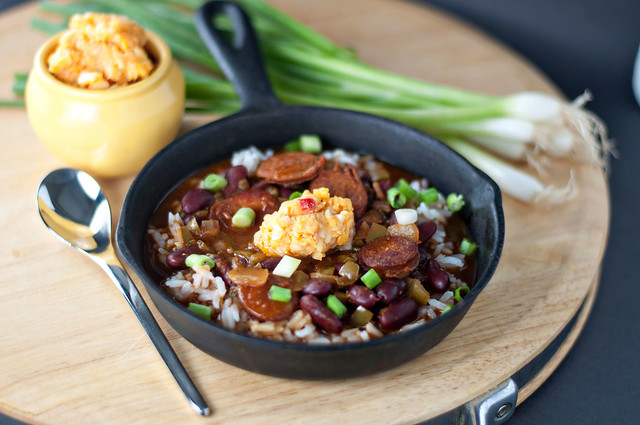
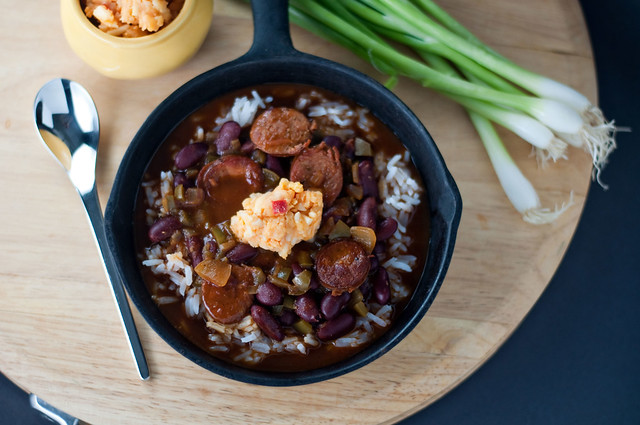
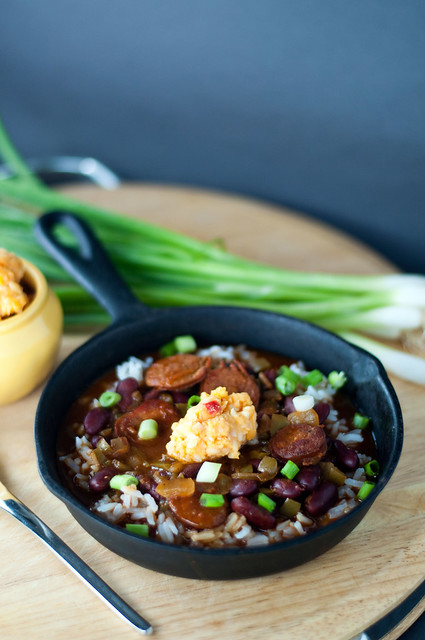
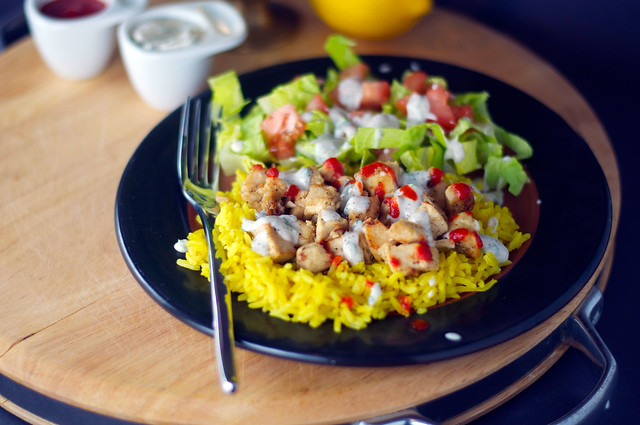
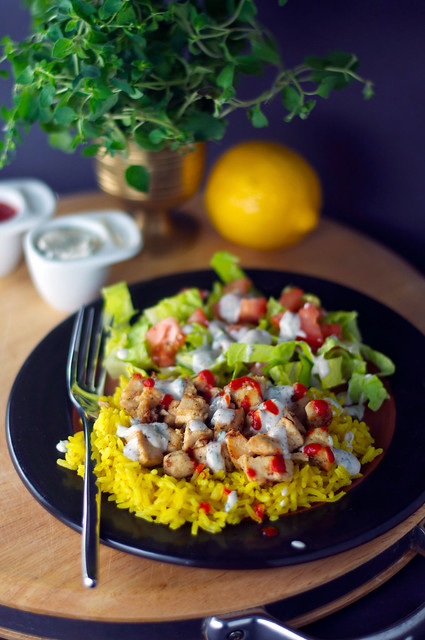
The finished product though, is a revelation. I may never cook another chicken breast without marinating it in this intoxicating (and so simple!) mixture. Lemon, coriander, garlic, oregano—this is piquant business.

The sauce? The sauce is so weird, y'all. I was absolutely convinced that it was inedible when I first stirred it together. I left out the sugar, because I really wasn't sure about stirring an entire tablespoon of the stuff into my mayo/yogurt mixture. But with those 2 aggressive teaspoons of black pepper, I actually sneezed when I tasted it. So I decided to give the sugar a try, and the whole thing tasted ... well, still odd. Still, as a last-ditch snatch at authenticity, I topped my chicken and rice with a few dollops. And guess what? Balance. It turns out that sometimes the route may be circuitous, but it still gets you to the finish line, which in my mind is deliciousness.

Full disclosure: I still think a little bit goes a long way with the white sauce, but it truly is the element here that elevates this to something beyond your typical (albeit yummy) chicken and rice dinner.

According to those in the know, halal cart chicken is always served with a lettuce-and-tomato salad, which pairs really nicely here—it adds both crunch and coolness against the spiciness of all that black pepper and the hot hot heat of what in my case turned out to be sriracha (the only hot sauce I had on hand).

In short, you should make this. Because it is wonderful. And because it is easy. And because I'm going to show you how to make it wonderful and easy in the recipe below. Which is to say, do as I say, not as I do.

In the stillness and quiet, I am still a cautionary tale.

Enjoy!

DSC_2905

Not-At-All-Halal Chicken and Rice

2 tablespoons fresh lemon juice
1 tablespoon chopped fresh oregano
½ teaspoon ground coriander
3 garlic cloves, roughly chopped
¼ cup extra virgin olive oil
Kosher salt
Freshly ground black pepper
2 pounds boneless skinless chicken breasts
1 tablespoon canola oil
2 tablespoons butter
½ teaspoon turmeric
¼ teaspoon ground cumin
1½ cups basmati rice
2½ cups chicken broth
½ cup lowfat mayonnaise
½ cup fat-free plain Greek yogurt
1 tablespoon sugar
2 tablespoons white wine vinegar
1 teaspoon fresh lemon juice
¼ cup chopped fresh flat-leaf parsley
1 Romaine lettuce heart, chopped
1 large tomato, chopped
Hot sauce
Naan (optional)

1. Combine first 5 ingredients in a blender; blend until smooth. Season to taste with salt and pepper. Place chicken and half the lemon juice mixture, reserving remaining lemon juice mixture, in a large zip-top plastic bag; seal bag, turning to coat chicken in marinade. Marinate in refrigerator 1 hour, turning bag occasionally.

2. Remove chicken from marinade, and season with salt and (liberally) with pepper. Heat canola oil in a large, heavy-bottomed skillet over medium-high heat until lightly smoking. Place chicken in pan, in a single layer, and cook without disturbing 4 minutes or until lightly browned. Turn chicken, and cook undisturbed 6 more minutes. Remove to a cutting board and let cool 5 minutes.

3. Chop chicken into roughly ¼- to ½-inch pieces. Transfer to a bowl, and toss with reserved marinade; cover with plastic wrap and refrigerate.

4. Melt butter over medium heat in a large saucepan; add turmeric and cumin, and cook 1 minute. Stir in rice and cook, stirring often, 4 minutes. Stir in chicken broth, and salt and pepper to taste. Bring to a boil over high heat; cover, reduce heat to medium-low, and cook 15 minutes. Remove from heat, and let rest 15 minutes.

5. Whisk together mayonnaise, yogurt, next 4 ingredients, and 2 teaspoons pepper in a small bowl. Season with salt to taste. Set aside.

6. Return same large, heavy-bottomed skillet to stovetop over medium-high heat; add chicken and marinade and cook, stirring occasionally, until browned and heated through. Top rice with chicken; serve with lettuce, tomato, hot sauce, white sauce, and naan, if desired. Makes 6 servings. 

 
0 comments

*stir-fry beef and broccoli.

DSC_2899

I have what amounts to a love-hate relationship with leftovers: My brain loves that they're cost-effective and ideal for lazy people; my heart thinks they are boring boring boring (and don't taste that great).

Even though I can admit that there are even some dishes that do manage to taste good the next day or cold—pizza, these wraps—I simply don't have the taste bud attention span to want That Same Thing for my next meal.

All of that, combined with my distaste for eating out of styrofoam containers (boo! all the food just steams in there! also the environment! probably in that order ... ), means that I don't eat takeout very often. 

I do, however, love the way the simplicity of this stir-fry—rice, beef, broccoli—plays with the complexity of the flavors. Those ingredients are simple, too, but they're just such wonderful friends: ginger, garlic, soy, fish sauce, hoisin. (I probably would have gilded the lily with a drop or two of sesame oil, but my grocer doesn't carry it.)

So far I've made the meal, eaten it, gone back for seconds, and twice (!) partaken of the leftovers. Two separate times! It's a leftover miracle. Even if once I slathered it in sriracha and draped a fried egg over it because That Is How I Do.

DSC_2907
 
Although let's be serious—can you blame me?
 
DSC_2917

A little leftovers note here: If you're going to go this route, put a couple of tablespoons of water in the pan with the rice and reheat it gently on the stovetop. Place the beef and broccoli in a dry skillet and kind of angrily crank up the heat—you want that hoisin to remember to redevelop a caramelized crust on the beef. And please, for the love of all things that taste good, don't put it in the microwave unless you absolutely have to. Microwaves were invented by people who thought flavor was an evil that had to be eradicated. I'm convinced it's half the reason frozen foods have so much salt in them—compensatory sodium!

I love the addition of the prepared Chinese hot mustard. (My grocery store sells this one.) I think it and the fish sauce really elevate this beyond the sweeter or blander versions you may have tried before. The mustard has something of a nasal, horseradish-style heat, so feel free to lather it all up with sriracha or chile flakes if you need a more focused kick to the tongue.

Simple, satisfying, and styrofoam-free—so much better than takeout.

Enjoy!

DSC_2904


Stir-fry Beef and Broccoli

1½ pounds flank steak, trimmed
Kosher salt
Black pepper
Cornstarch
2 tablespoons canola oil
¼ cup prepared hoisin sauce
½ white onion, finely chopped
1 (1- to 2-inch) piece fresh ginger, minced
4 garlic cloves, minced
1 (15-ounce) can reduced-sodium, fat-free beef broth
2 teaspoons fish sauce
2 teaspoons Worcestershire sauce
2 teaspoons low-sodium soy sauce
2 tablespoons prepared hot mustard
1 large bunch broccoli florets
Hot cooked basmati or long-grain rice
Garnishes: chopped green onion, sesame seeds

1. Cut flank steak in half lengthwise; cut each half crosswise into very thin slices. Toss steak with salt, pepper, and just enough cornstarch to coat.

2. Heat canola oil in a skillet over medium-high heat until very hot. Add beef, in batches, and sauté 5 minutes or until edges are deeply browned. Place in a bowl and toss with hoisin; set aside.

3. Add onion to skillet, and cook 3 to 4 minutes or until softened and lightly browned; add ginger and garlic, and cook 1 more minute. Stir in beef broth, scraping to remove browned bits from bottom of pan. Stir in fish sauce and next 3 ingredients.  

4. Reduce heat to medium-low, and add broccoli florets. Cover and cook 10 minutes. Stir in beef; cover and cook 10 more minutes or until broccoli is tender and beef is heated through. Serve over rice; garnish, if desired. Makes 6 servings.

 
1 comments

*tuna salad niçoise.

DSC_3084

I posted a version of these photographs over on Instagram (look me up!) with the caption "trying to get my mojo back."

And it's true—while I could tell tall tales of action-packed holidays and busy work schedules and many too many meals out, the simple fact is that some time in November my wonderful sister and brother-in-law gave me a session with a house cleaner for my birthday, which led me to put my photo lights in the closet and ... well, that's pretty much all it takes to leave me thoroughly distracted.

So how have I fed myself the past couple of months? Mostly with spoonfuls of cottage cheese straight from the container for breakfast, brick-sized turkey sandwiches grabbed out of deli cases for lunch, and convenience foods for dinner. I dabbled in the kitchen here and there, but my efforts felt for the most part clumsy and disappointing and unsatisfying. 

And you know what? It started to really get me down. Granted, I know about the extent to which our heads are in the game when it comes to food more than most, but I realized I was feeling listless and off track. Putting mystery meat, other assorted blech, and much of the world's supply of potatoes into my body day after day was affecting my waistline and my psyche.

I knew that if I wanted to regain my footing, I was going to need an absolute bolt out of the blue.

And here she be:

DSC_3074

Beautiful. Fresh. Colorful. "Taste the rainbow" doesn't have to mean Skittles, friends. These are all healthy, unadulterated ingredients, but they're also delicious and indulgent.

For this little jump start, I went to the fancy market and bought all organic ingredients. That's truly not necessary—I find I can't afford to eat that way all the time, in funds or in time—but it went a long way toward making this meal feel like a treat I was giving myself. In all, I spent about $35 on everything you see here (with potatoes and tomatoes and eggs and olives and onion and greens left over), and got four good-size portions out of the deal. That's better bang for your buck than I generally get from eating out.

In the end, this is a salad. Some people just can't get all that excited about a salad, and I totally understand that. Sometimes I am some people, too. But the beauty of this salad is that there are so many components that each bite can taste a little bit different than the last, which makes your taste buds ever so happy. Especially if you save the olives for last.

There are a few tips to making this work as a quick meal, as opposed to feeling like you're making seven different dishes:

1. Cook the potatoes first. Blanch the green beans during the last few minutes of the potato cooking time.

2. Slice the onion, halve the tomatoes, trim the beans, and make the dressing while the potatoes cook. Also set your eggs out on the counter to come to room temperature.

3. Once the green beans and potatoes come out of the boiling water, add the eggs—fewer pots to wash!

4. Grill the tuna first, and slice the cooked potatoes in half; then add the potatoes, cut-side down, to the grill to pick up a little of that charred flavor (OK and maybe also so they'll look pretty.)

5. Set aside some dressing, and toss the warm potatoes in it the minute they come off the grill. FYI this does nothing to make the process easier or more efficient, it's just delicious.

6. Remember to have some ice on hand if at all possible for shocking the eggs. This makes the water cold-cold, so that egg whites gasp in horror and shrink from the shells, which makes peeling ever so much easier. I did not have ice, and ... well, you'll see there are three eggs here instead of four. (RIP fourth egg.)

Enjoy!

DSC_3070

Tuna Salad Niçoise

8 fingerling potatoes
10 ounces haricots vert or fresh green beans
½ 10-ounce package mixed baby lettuces
8 ounces grape tomatoes, halved
¼ large red onion, thinly sliced
16 pitted kalamata or niçoise olives
2 tablespoons Dijon mustard
4 tablespoons red wine vinegar
3 tablespoons extra virgin olive oil, divided
2 garlic cloves, minced and divided
1 (8-ounce) tuna steak
Kosher salt
Freshly ground black pepper
4 large eggs, at room temperature

1. Cook potatoes in boiling water to cover 15 minutes or until just tender. Add haricots vert to boiling water during last 3 minutes of cooking time. Remove haricots vert and potatoes from boiling water with tongs; place haricots vert in a bowl of ice water to stop the cooking process. Slice potatoes in half lengthwise. Set aside.

2. Whisk together mustard, vinegar, 2 tablespoons oil, and 1 garlic clove in a medium bowl. Set aside.

3. Season tuna on both sides with salt and pepper. Heat grill pan over medium-high heat, and brush lightly with olive oil. Cook tuna 3 minutes on one side; turn, and cook 1 to 2 minutes (for rare) or until desired degree of doneness. Set aside.

4. Place potatoes, cut sides down, on grill pan; cook 3 to 5 minutes or until potatoes are well marked. Remove to a bowl, and toss with about 2 tablespoons reserved dressing. Set aside.

5. Add eggs to boiling water; cook exactly 6 minutes, and remove to a bowl of ice water.

6. Heat remaining 1 garlic clove in remaining 1 tablespoon oil in a small skillet over medium heat about 1 minute or until fragrant. Add haricots vert, and toss until lightly heated through. Sprinkle with salt to taste. Cut tuna into thin slices. Carefully peel eggs, and gently cut in half crosswise.

7. Line a platter with baby lettuces; top with tomatoes, onion, olives, haricots vert, tuna, eggs, and potatoes. Serve with remaining dressing. Makes 4 servings.

 
1 comments

*sausage–brussels sprouts penne with creamy goat cheese sauce.

DSC_2895-1

Happy Thanksgiving and Hanukkah week, everybody!

Here on the Woodside, we're celebrating with a one-day work week, the traditional parade-family-meal triumvirate on Thanksgiving Day, and putting up the Christmas tree on Friday—which also happens to be my birthday, but it's a boring one this year, so I'm going to celebrate by bringing out the twinkly lights because they're my favorite.

In typical fashion around these parts, I volunteered to be responsible for some bits and pieces where the Thanksgiving meal is concerned—because being in the kitchen is also my favorite—and I have done zero planning. I went to the grocery store yesterday and got a pretty good preview of the punishment I'll have to endure for my procrastination.

Partly I wait until the last minute to plan because I am a notorious second-guesser, so I'm much better off making impulse decisions where dishes are concerned. But almost without fail, what ends up happening is that I return to a recipe I've made many times before. Especially when feeding a crowd, I have to agree with Ina Garten's mantra that it's much less stressful to stick to something you already know works. That way you have calm confidence, and the people you're feeding have great food.

This dish is one of those standbys for me, something I've made and modified so many times I don't even remember where I originally discovered it. It demonstrates my favorite formula for comfort food: savory heat, hearty greens, salty cheese, and—naturally—pasta.

It's a simple and easy weeknight meal, which is another reason it's become a standby, but I'm putting it here because it would also make a great way to reuse those Thanksgiving leftovers: Just stir in chopped leftover turkey in place of the sausage, and whatever Brussels sprouts you have remaining from your holiday table. After that it's just a matter of boiling the pasta and stirring through that creamy goat cheese.

After lots of trial and error with this dish, I've discovered that the easiest way to approach the Brussels sprouts and sausage is to roast them in the oven together. (It also helps the sprouts take on some of that lovely, spicy sausage flavor.) Because the little cabbage heads can sometimes be unpredictable in terms of how long they need to roast, slice your sausage a little bit thicker than you see here—you want it to come out juicy and substantial with just a little crispiness around the edges; you don't want jerky.

When it comes to goat cheese, I think the more coarsely ground black pepper, the better. In that same vein, taste often as you're seasoning—some goat cheese and sausage varieties contain more salt than others, so you don't want to overdo it.

I added a few sage leaves to the milk early on in the process, but then strained it out—that gave things a subtle woodsy flavor and aroma without the punch in the taste buds I sometimes think sage can be. Aggressive little herb.

I hope you try this dish and return to it as often as I have over the years. And I hope you have as many things to be thankful for as I do. And if you're celebrating Thanksgiving at your house tomorrow, I hope you're a lot more prepared than I am.

Enjoy!

DSC_2890-1

Sausage–Brussels Sprouts Penne with Creamy Goat Cheese Sauce

1 pound Brussels sprouts, trimmed
Olive oil
Salt
Freshly ground black pepper
Dried crushed red pepper (optional)
2 links andouille sausage, sliced
2 cups whole milk
½ white onion, very finely chopped
4 garlic cloves, minced
6 sage leaves
2 tablespoons butter
2 tablespoons flour
6 ounces goat cheese
8 ounces dried whole wheat penne

1. Preheat oven to 425 degrees. Line a baking sheet with aluminum foil.

2. Place Brussels sprouts on prepared baking sheet; drizzle lightly with olive oil, and sprinkle evenly with salt, black pepper, and red pepper, if desired. Add sausage; roast 20 to 25 minutes or until sprouts are tender and sausage is golden brown.

3. Meanwhile, stir together milk, onion, garlic, and sage leaves in a medium saucepan over medium-low heat until just barely simmering. (Do not boil.) Cook, moderating temperature if necessary, 15 minutes. Drain mixture through a fine, wire-mesh sieve, discarding solids.

4. Melt butter in a skillet over medium heat; whisk in flour and cook 1 minute. Slowly whisk in hot milk, and cook until mixture thickens slightly. Reduce heat to low, and whisk in goat cheese until smooth. Season to taste with salt and black pepper, and keep warm.

5. Cook pasta in boiling salted water according to package directions. Stir together hot pasta, roasted Brussels sprouts and sausage, and goat cheese sauce. Top with additional black pepper, if desired. Makes 4 servings.

 
0 comments

*focaccia.

DSC_2891

It is not a well-kept secret that I can't bake.

For some reason, from the start of every attempt, my confidence wavers, panic sets in, and my brain shifts firmly into the off position. In my mild defense, every time I feel I've followed the directions to the letter, somehow things do not turn out as they should.

Fortunately in my case, this isn't a devastating handicap—baked goods are not generally as high on my list as, say, cheese. Or pasta.

Though to be fair, I am not sure I could make either of those things, either.

Flour flummoxes me. I think I'm always using too much or too little, and I cannot measure it without simultaneously getting it all over my floor, countertop, and person.

I don't know exactly what is meant by "mix just until combined," but it's a veritable guarantee that if I pour any sort of batter into any sort of pan, there's going to be a glump of dry ingredients at the bottom of the bowl.

My oven only has two speeds: undercooked and probably dangerous in the middle, or dry and dense enough to make a nice homebuilding material.

But by far my greatest nemesis is yeast. What do you mean, "put in a warm place (free from drafts)"? What do you mean, "add warm water"? WHAT IS WARM?

Luckily I am a fact-checker by trade, and I am not one to let a stinky little microorganism get the best of me. So I got me to the Google, and learned a few things.

A) Warm water = somewhere between 105 and 110 degrees. Yes, I used a thermometer to measure it; I'm not a wizard.

B) A warm place = well, frankly, a lot of things. Based on the Internets, people have had to imagine all sorts of locations for proofing breads and pastries, everything from the top of the refrigerator to the inside of the clothes dryer. I used two of the simplest suggestions I could find (my dryer is outside in an uninsulated room, so that wasn't going to work): Place a cup of water inside the microwave, and heat until boiling—this worked when the dough was in the mixing bowl—and place a pan of water in the lower half of the oven, then preheat the oven to 200 for five minutes—this worked while the dough proofed on the sheet pan.

And finally, if there's one thing I know about having two left feet in the kitchen, it's that it's best to start simple. I decided to try Anne Burrell's focaccia recipe, because I had the good fortune to have watched her prepare it on her show. (She made it look so easy!)

Things I learned: Baking is a patient person's game. (I believe we just discovered the root of my failures.) There's a lot of hanging around and waiting in bread-making, while you let the yeast do its job. Baking is a lot about going by feel. That takes practice, which I still need—I'm not sure if my dough was too tacky or too dry, but I didn't exactly get the fluffy center I hoped for.

HOWEVER, the dough rose successfully twice (!) and the finished product was super delicious, even if it had a slightly chewier texture and slimmer profile than I was aiming for.

DSC_2884

It made for a delicious BFD (breakfast for dinner, potty mouth)—eggs and soldiers, served up very simply with a chai latte, six-minute eggs (get that recipe here), and seconds-before-burning bacon. Which is the only way to make bacon.

The next day, my focaccia experiment made for a fabulous three cheese/bacon panino, and I was doubly sold on the miracle of making your bread yourself.

Baking! I done it! And I think I'm going to do it again. You should, too!

Enjoy!

DSC_2895

Focaccia
adapted from a recipe by Anne Burrell
1¾ cups warm water (between 105 and 110 degrees)
1 package active dry yeast
1 tablespoon sugar
5 cups all-purpose flour
1 tablespoon kosher salt
1 cup extra virgin olive oil, divided
Coarse sea salt

1. Combine first 3 ingredients in a small bowl. Place bowl in a warm place 15 minutes or until yeast bubbles and is aromatic.

2. Combine flour, kosher salt, ½ cup olive oil, and yeast mixture in the bowl of an electric mixer fitted with a dough hook at low speed until dough comes together. Increase mixer speed to medium, and beat 5 to 6 minutes or until dough is smooth and soft. (Sprinkle with flour if dough is overly sticky.)

3. Transfer dough to a lightly floured surface, and knead by hand 1 or 2 times. (Sprinkle with flour if dough is overly sticky.) Coat mixer bowl lightly with olive oil, and return dough to bowl. Cover with plastic wrap and place in a warm place at least 1 hour or until dough doubles in size.

4. Coat baking sheet with remaining ½ cup olive oil. Transfer dough to prepared baking sheet, pressing out to fill pan. Turn dough over, and continue to stretch dough to fit baking sheet, spreading with your fingers to make holes all the way through dough. Place baking sheet in a warm place at least 1 hour or until dough doubles in size.

5. Preheat oven to 425 degrees. Sprinkle dough liberally with coarse sea salt, and drizzle lightly with olive oil. Bake 25 to 30 minutes or until golden brown. Let cool before serving. Makes 10 to 12 servings.

 
0 comments

*seared filet with tomato and fresh mozzarella.

DSC_2926

You know that warm, contented, even feeling you get when you do something for someone else? It can be anything—offering a ride to the airport, taking care of a pet, loaning your wedges when someone has nothing to wear with her new pants—but by far the fastest and easiest way to get there is by cooking. By and large, people love to have someone make a meal for them. It's comforting and stress-relieving and generous, and those are all wonderful feelings to both give and receive.

But as it turns out, you can (and I would argue, ought to) achieve the same sense of happy, self-high-fiving bliss when you cook for one.

There are a lot of rules out there that are alleged to improve the lives of single people: Eat at a proper  table. Don't eat in front of the TV. Don't dip pretzels in the tub of cream cheese and call it dinner.

I break all of those rules. Stop judgin' me, Internet advice columns. I like my couch and my Big Bang Theory and my sleeves of saltines, and I shan't apologize for it.

But the truth is that there are a lot of perks to being the only one in the house who brings home the bacon, shall we say. No one else gets to say, "I don't like mushrooms" or "Do you have to put avocado on everything?" or "Sweetie, I love you and I love turkey sandwiches, but I think this is bordering on obsession and we might need to call in some medical professionals if you don't eat something else."

It also means that, because you aren't trying to please vast numbers of all manner of people, every now and again even your recession-strained budget will let you indulge a little.

So yes I did buy this $14 filet mignon on a Tuesday night. I ate half of it with this pretty little wedge of iceberg and then turned the other half into a steak salad for lunch the next day, which technically makes this a $7 steak dinner, which technically makes this worth every penny.

The steak is loosely based on Ina's method: hot pan, sear, roast, rest. Grills are great if that's your bag, but I'm unlikely to fire up some charcoal on a weeknight when I'm just cooking for me. (Or ever, really. Fire is hot and I am clumsy.)

When I decided to make this a Caprese steak, I forgot one teensy little detail: It's late October. I took a chance and got super lucky with what has to have been the absolute last of the good late-summer tomatoes. I didn't have high hopes for it given that it had lost some of that plump cheerfulness you like to see in an Alabama mater, but when I sliced into it it was absolutely perfect.

There's a decent chance I stood at the stovetop and seared the steak with one hand while I jammed slices of juicy tomato and cold fresh mozzarella into my mouth with the other.

Reducing the balsamic is just the easiest thing in the world to do; you leave it to bubble away in a pan and let your nose tell you when it's syrupy and thick. (Wait for things to smell sweet and smoky, but do keep a half an eye on the pan so it doesn't burn!) I could even have let it reduce a bit further in this case, but I was hungry. You can see that it cascaded off the hot, melty cheese, but pooled into a dark, sticky puddle around the steak. Ain't nothin' wrong with that.

I was lazy with my wedge salad, because that's exactly what a wedge salad allows you to be. A hunk of iceberg, a drizzle of dressing, and a smattering of store-bought bacon bits were all I needed. A proper wedge salad would benefit from thick chunks of blue cheese, crispy pieces of real bacon, and bits of chopped tomato, but I had piled so many layers of goodness onto my steak that I wanted to keep things simple.

A simple salad. A splurge on a steak topped with gooey, salty cheese and sweet, lightly roasted tomato. Big, bold flecks of freshly ground black pepper all over everything. Make it for you and yours some Tuesday soon! 

Or, better yet, wait until they're out of the house and make it all for you.

Enjoy!

DSC_2925

Seared Filet with Tomato and Fresh Mozzarella

¼ cup balsamic vinegar
1 (10-ounce) filet mignon
Kosher salt
Freshly ground black pepper
1 tomato slice
2 fresh mozzarella cheese slices

1. Preheat oven to 400 degrees. Heat a grill pan or cast iron skillet over high heat 5 to 7 minutes or until very hot.

2. Meanwhile, pat steak dry with a paper towel, and sprinkle with kosher salt and black pepper on all sides. Cook steak about 2 minutes on all sides or until evenly seared (about 10 minutes total).

3. Top steak with tomato and mozzarella; place pan in oven, and cook until a thermometer inserted in thickest portion of the steak reaches 125 degrees (for medium-rare).

4. Remove steak from pan, cover loosely with aluminum foil, and let rest 10 minutes.

5. Place balsamic vinegar in a small saucepan over medium-low heat. Cook, stirring occasionally, until vinegar has reduced by half. Drizzle over steak before serving. Makes 1 serving.

 
1 comments

*wasabi shrimp hand roll bowl.

DSC_2874

I'm kind of a huge pain to go to a sushi restaurant with.

This is in part because I have an inexplicable distaste for scallops, lobster, and crab, and there is a lot of crab in sushi rolls.

(Don't even get me started on imitation crab. Or, for that matter, cream cheese, which is a blight on the textural delight that sushi rolls are meant to be.)

I do, however, love tuna in my sushi in absolutely any incarnation. My friend Jeannie and I used to order hamachi nigiri as dessert at our favorite local sushi spot. Which happens to also be the place that I discovered the spicy tuna hand roll.

It might surprise some people to know that my Deep South hometown has a fair number of fair sushi counters, but I daresay Jinsei is the best. Unfortunately, these days I mostly drive by and stare at it longingly, because I can't afford to eat there on the regular.

The hand roll isn't on the menu, but if you ask for it they'll wrap it right up for you on the spot. Hand rolls aren't traditional log rolls of sushi; they are cones of nori wrapped around all imaginable kinds of goodness. They got their name because they were originally meant to be eaten immediately, passed from the sushi chef right into your hot little hands, and then promptly devoured.

Jinsei's spicy tuna hand roll is a soft sheet of seaweed curled up with a little bit of sticky rice, cucumber, avocado, daikon, and spicy tuna (generally a mix of the fish with some mayo and sriracha). Sometimes it was garnished with a little seaweed salad; sometimes a smattering of sesame seeds. This one is really at the chef's discretion.

Alas, sushi-grade tuna is simply not a realistic aspiration for a weeknight meal on the Woodside. It requires enough funds and enough of a commute to be a special occasion item. Instead, I tried to just grab at those flavors and textures that I love without aiming very closely at all to the original inspiration.

In an effort to lighten things up I omitted the rice here, but it would be a delicious addition. And I will admit that I purchased pre-made coleslaw mix at the store because I am only one lady and I can never, ever finish an entire head of cabbage.

Nor would anyone appreciate that, I'd wager.

Ahem.

Because I can't keep my grubby little hands off anything I see in the store that's new, I'd bought these seaweed snacks a few days before, and they turned out to be a nice little taste of the ocean to energize those store-bought shrimp. Nothing really says "sushi" more than nori, and these are very lightly salty and flavored with sesame. (When I grabbed that link I discovered that there is also a wasabi version, which my store sadly does not yet stock!)

These were medium shrimp. The larger ones in my market were head-on, and I just didn't have the wherewithal to tackle that task on a Tuesday night. These were only nominally medium shrimp, when they should have perhaps been labeled shrimpy shrimp. 

DSC_2872

In other words, they were leetle guys. I poured the whole shebang into my grill pan, marinade and all, which let the soy sauce get syrupy and slightly sweet, a nice counterpoint to the BANG of wasabi.

I'm going to call for anywhere between 1 and 3 tablespoons of sriracha here—I went with three, and it was powerful hot. Just taste taste taste and see where your magic number is.

Enjoy!

DSC_2867

Wasabi Shrimp Hand Roll Bowl

1 (14-ounce) bag coleslaw mix (cabbage and carrots)
3 green onions, chopped
¼ cup light mayonnaise
1 to 3 tablespoons sriracha
½ pound raw medium shrimp, peeled and deveined with tails on
2 tablespoons low-sodium soy sauce
1 tablespoon wasabi paste
1 tablespoon rice vinegar
¼ teaspoon ground ginger
Sesame seeds
1 avocado, chopped
Garnish: sliced nori, chopped green onions

1. Combine first 4 ingredients in a medium bowl; set aside.

2. Whisk together soy sauce and next 3 ingredients in a medium bowl until well combined; add shrimp, tossing to coat. Marinate 10 minutes.

3. Grill shrimp in grill pan over medium-high heat, 1 to 2 minutes on each side. Pour marinade over shrimp during last minute of cooking. Place shrimp and marinade in a medium bowl, and toss with sesame seeds.

4. Divide reserved spicy coleslaw among 4 serving bowls. Top evenly with shrimp and avocado, Garnish, if desired. Makes 4 servings.

 
0 comments

*pollo adobo (smoky jalapeño chicken).

DSC_2877

There's a Mexican restaurant in town that is fairly close to the apartment I used to live in, and about halfway between that apartment and work, which means I was there quite a bit. (You know, before I decided to branch out and eat at other ... Mexican restaurants.)

My people eat a lot of Mexican food.

It was just the right combination of cheap and trashy, but the margaritas were always on special, the salsa was jammed with cilantro, and the food gave the impression that someone in the kitchen really cared about what s/he was doing.

For a while the restaurant closed, when someone tried to turn the strip mall it's in into residences, but when that venture failed it miraculously returned! Unfortunately it's been a little fancified, replacing some of its lovable cheap trashiness with dimmer lighting and the rumbling cacophony of Other People's Children, and we haven't made it to the new incarnation with the same frequency. When the magic of sticky tables and puckery margarita mix and green carpet–covered floors has passed, it has passed.

Still, even in a town with a Mexican restaurant on nearly every corner (and Birmingham certainly applies as one of those cities), it can sometimes be difficult to find menu items outside of the box of the usual tacos, burritos, and nachos—also known as the holy trinity, amen.

I am not here to undermine the many, many wonderful attributes of tacos and burritos and nachos, but sometimes it is nice to break free of those flavor profiles. And the dish I always ordered at Mexico Lindo was the pollo adobo (which seems to have been renamed the pueblo lunch): "black beans topped with chicken in hot adobo, onions & queso fresco."

At Lindo they serve the dish in a wide, shallow bowl, lined with a flour tortilla to soak up the beans and the smoky broth, and topped with a light sprinkle of cheese and charred green onions.

There are a lot of alterations to that basic idea here—I am, as you can see, not a girl with a talent for light sprinkling where cheese is concerned. That's Monterey Jack, too, because my market didn't have any queso fresco. I also shredded the chicken, as opposed to crisping chunks of it on the flat top, the way it's served in the restaurant version. Because I'd gotten home from work pretty late this day, I picked up a rotisserie chicken and shredded it into the broth, but really any kind of protein you like would work here. (I have a dream that involves chargrilled shrimp.)

There's avocado here because I love it, and the signature grilled onions. I just placed mine in a dry grill pan until they developed some nice marks, the white ends got tender, and the green tips turned crispy.

I would add two chipotle peppers first, simmer, and then taste. If you like things a little smokier/spicier, feel free to add more! I dipped in about a teaspoon of extra adobo sauce at the end for a little kick. You can season as you go, too—I try to keep an eye on my salt intake when I'm cooking for myself, so I seasoned at the end so that I didn't layer too much on as I went. Start with 2 cups of water, and then add if you feel like things start to dry out. I started with 3 and found the results slightly soupier than I'd planned on.

I like to dip the green onions into the sauce and then eat them like Twizzlers, but for leftovers I simply chopped them up and stirred them in. They add just the right hit of mild, grassy crunch for the warm broth, creamy beans, hearty chicken, and smooth avocado.

¡Buen provecho!

DSC_2874

Pollo Adobo (Smoky Jalapeño Chicken)

2 cans reduced sodium black beans, drained and rinsed
1 tablespoon olive oil
½ red onion, finely chopped
3 garlic cloves, minced
1 teaspoon dried Mexican oregano
1 bay leaf
2 chipotle peppers in adobo sauce, finely chopped
1 teaspoon adobo sauce
2 rotisserie chicken breasts, shredded
1 bunch green onions, trimmed
4 taco-size flour tortillas
Salt, to taste
Black pepper, to taste
1 avocado, sliced
4 ounces Monterey Jack cheese, shredded

1. Place half of beans in a food processor with about ¼ cup water; puree until smooth.

2. Heat oil in a stockpot over medium heat; add onion, and cook 5 minutes or until translucent. Stir in garlic, oregano, and bay leaf; cook 1 minute. Stir in chopped chipotle peppers and adobo sauce; cook 30 seconds. Stir in chicken, coating with sauce. Stir in whole beans, reserved bean purée, and 2 cups water; bring to a boil, cover, and simmer 20 minutes or until slightly thickened. (Stir in additional water if mixture becomes too thick.)
 
3. Meanwhile, heat grill pan over medium heat until hot. Grill green onions, turning occasionally, 8 minutes or until tender. Remove from heat, and set aside.

4. Season chicken mixture with salt and black pepper to taste; stir in additional adobo sauce or chipotle peppers, if desired. Remove bay leaves, and discard.

5. Heat tortillas in a microwave oven on HIGH 10 seconds. Line serving bowls with tortillas, and top with chicken mixture. Top evenly with cheese, avocado slices, and reserved grilled green onions. Makes 4 servings.

 
4 comments

*beef-and-lentil stew with romano potato puffs.

DSC_2878

This is sheer comfort food, my people.

But first, I feel compelled to do a little proppy shout-out: My sister got me that bangin' orange spoon (part of a colorful set I adore); the seersucker fabric and the Anthropologie canister (bringing my total canister count to nine, because I am insane) were loot from Coastal Living prop sales; and as a last-minute thought because my "living herbs" thyme was attached to a healthy-but-ugly root ball, I shoved it into a beautiful gold mortar from my friend Jenny. The board was a hand-me-down from my dad, and the bowl is of course (of course) a treasured gift from my gramma.

And that little commercial break was courtesy of the fact that every piece reminds me of a person I love or a fond memory, even if that fond memory was just buying something pricey for a sweet sweet deal.

Now, back to the comfort food!

I wasn't in any particular need for comfort last night, for which I am grateful, but it was officially October, and I wanted something that said, fall is here even if the temperatures outside still hover in the late-summer region.

This also was originally intended to be vegetarian, but something about the super-lean beef just called out to me. It's simple enough to just omit and have a lovely meat-free option if that's your druthers. And speaking of super-lean, this beef was just 7 percent fat, so I had to add a little oil to the pan before sautéing my veggies. If your beef is chunkier, you can just drain all but a tablespoon or so of the fat away, and then use that for even meatier flavor.

You can simmer the lentils and vegetables in water if you like, but I used beef broth in this case. If you follow my lead, go really easy on the salt until everything has had a chance to cook completely. It can be tough to judge the saltiness of the broth you're using before then. After that, you can just salt to taste!

I pureed about half the soup with my immersion blender before I stirred the beef in. I liked the thickening effect, but still having some bite to the lentils. It's a completely optional step, though—this will taste lovely either way.

The potato puffs (hat tip to my friend Julie, who gave me the alternative to calling them "balls") were cheesy, herby little clouds that melted into the stew. You just want to put them into the pan over a gentle heat and let them develop a nice golden brownness on one or two sides—they're delicate, so they can fall apart in a heap if you try to move them around too much. And keep an eye on them: When they are just warmed through and kissed with butter, they're perfect.

It occurred to me after I inhaled a bowl of this in less than a minute or so that it's really almost a deconstructed shepherd's pie—there's the hearty meatiness and the stick-to-your-ribs veggieness and the earthy herbiness and, well, potatoes. If you're on the go, you can serve the stew with whatever quick potatoes you like. Just make sure they're kissed with butter, obvs.

Just before I plated this up (and I absolutely love it when this happens), I decided there was something about the symmetry of the potatoes that was bugging me, so I plopped a big old dollop of sour cream in the middle out of nowhere. When it was time to eat, I realized that it's absolutely essential to the flavor here—tangy and bright and cooling and perfect with the potatoes. So if you do decide to replicate this for dinner this week, don't omit the sour cream! It's just that extra oomph that's totally worthwhile.

I had a little sour cream in my fridge at home, which is how that impromptu decision came to be made, but other than a few cloves of garlic I bought everything else at the store, and came out with at least six servings for less than $20. Healthy, delicious, and smart: jackpot!

Enjoy!

DSC_2885

Beef-and-Lentil Stew with Romano Potato Puffs

1 pound extra-lean ground beef (93% lean)
Kosher salt
Freshly ground black pepper
1 tablespoon canola oil
1 cup diced yellow onion
½ cup diced carrot
½ cup diced celery
4 garlic cloves, minced
1 cup dried lentils
1 teaspoon dried crushed red pepper
6 fresh thyme sprigs
1 bay leaf
4 cups low-sodium, fat-free beef broth
Romano Potato Puffs (recipe below)
Garnishes: sour cream, fresh thyme leaves

1. Place beef in a stockpot over medium-high heat; sprinkle with kosher salt and black pepper, and cook, stirring occasionally, 5 minutes or until browned and cooked through. Transfer beef to a bowl, and set aside.

2. Return pot to stove over medium heat; add canola oil, onion, and carrot. Cook 3 minutes or until onions are softened. Add celery and garlic, and cook 2 more minutes. Stir in lentils and next 3 ingredients, and stir until combined. Stir in beef broth, and bring to a boil. Cover, reduce heat, and simmer 45 minutes or until lentils are tender.

3. Remove thyme stems and bay leaves from lentil mixture. Puree about half the lentil mixture using an immersion blender (or transfer a few cups to a traditional blender, and puree until smooth). Stir in reserved beef until heated through. Serve stew with Romano Potato Puffs, and garnish, if desired. Makes 6 to 8 servings.

Romano Potato Puffs

2 medium russet potatoes, chopped
¼ cup shredded Romano cheese
Salt, to taste
Black pepper, to taste
Fresh thyme leaves (optional)
1 teaspoon olive oil
1 teaspoon butter

1. Place potatoes in cold water to cover in a medium pot; bring water to a boil and cook about 12 minutes or until potatoes are fork-tender. Drain potatoes well and return to pot.

2. Mash potatoes with cheese and salt and pepper to taste. Stir in thyme, if desired. Shape mixture into 1-inch balls. (Mixture will be dry.)

3. Heat butter and oil in a small skillet over medium-low heat until butter is melted. Cook puffs in butter mixture 1 to 2 minutes or just until heated through and golden brown on 1 or 2 sides. (Handle very carefully when turning puffs in the pan.) Serve immediately. Makes 6 to 8 servings.

 
4 comments

*slow cooker thai chicken and rice.

DSC_2881

I had every intention of beginning this post with, "A few months ago, I pinned ... " And then I revisited my Pinterest yum board and realized I pinned this recipe a year ago. Which is just proof that I have no concept of time and good lord where did 2013 go?

When I pinned this recipe a year ago, I commented that it would be a great thing to try for my first attempt at slow cooking, should I ever procure a slow cooker.

And then I did procure a slow cooker, a Christmas gift from my dad and his husband, almost a year ago, and I developed an unhealthy fear of ... cooking things slowly.

Partly I think that's because I am not really familiar with slow cooker recipes, so I didn't know how to recognize a good one when I saw one, partly because I'm generally more a fan of recipes that have lots of fun but easy, therapeutic steps, and partly because I have a healthy fear of burning my house down.

Yes I know that you are statistically pretty unlikely to burn down your house with a Crock Pot, but I've always been a little ahead of the curve, accident-prone-wise.

This past Saturday's forecast called for a rainy half day and lots of people in my life who I count on to entertain me being busy or asleep, so I dragged my wilted Friday afternoon self to the grocery store and prepared for my maiden voyage.

Personally, I appreciated the prep work this dish required, even though I understand why the typical Crock Pot dump-and-cook approach is considered extremely valuable among the slow cooker set. What I enjoyed most about my first slow-cooking experience is that I got to do all of the things I like about being in the kitchen—chopping, whisking, mincing, peeling (well, not peeling so much; my knuckle was not the biggest fan of that part; see above re: accident prone)—but not doing the cooking myself made it feel a little bit like a magic trick. Insert ingredients, abracadabra, and presto! Dinner.

I made some adjustments to the original formula—I forgot the coconut milk, so I substituted what I had on hand, which was heavy cream. (Full disclosure: On my tombstone, it shall read, "Here lies K. She forgot one ingredient.) I also don't have access to quick-cooking tapioca, so I subbed cornstarch as a thickener.

I really liked the tenderness of the chicken and the hint of curry and peanut butter, but after five and a half hours of cooking, some of those the flavors needed a little brightness—the lime stands up beautifully (and only improves as leftovers), but a little sriracha and chopped roasted peanuts give the heat and salt a little boost. For color and life, cilantro comes in super handy.

So big thanks to Love at Home for being my inspiration! I made a big meal with very little effort, and I didn't burn down the house. Just right for a rainy couch-bound day spent testing my mental health by watching too many episodes in a row of The Newsroom.

Enjoy!

DSC_2879


Slow Cooker Thai Chicken and Rice

2 medium onions, thinly sliced
1½ cups sliced peeled carrots (about 3 medium)
1 small red bell pepper, thinly sliced
2 pounds boneless, skinless chicken breasts, cut into 1-inch pieces
¾ cup low-sodium, fat-free chicken broth
3 tablespoons creamy peanut butter
½ teaspoon lime zest
2 tablespoons fresh lime juice
2 tablespoons low-sodium soy sauce
2 tablespoons cornstarch
1 tablespoon grated fresh ginger
3 teaspoons red curry paste
4 garlic cloves, minced
½ cup heavy cream
1 cup frozen peas
Hot cooked jasmine rice
Garnishes: sriracha, chopped roasted peanuts, fresh cilantro leaves 


1. Place first 3 ingredients in a slow cooker; top with chicken. Whisk together chicken broth and next 8 ingredients in a medium bowl until smooth. Pour over chicken and vegetables.

2. Cover slow cooker, and cook on low 5&frac12 hours. Stir in cream and peas; let stand, covered, 5 minutes.

3. Serve chicken mixture over hot cooked rice. Garnish, if desired. Makes 8 servings.

 
0 comments

*cheesy broccoli and orzo risotto.

DSC_2872

Look, Ma! Veggies!

See way there in the back, where the chicken is all snuggled up under the orzo blanket? Yes, that's leftover makeover right there. But the chicken is really just an understudy in this case—the orzo is the star.

(Note to self: Begin manufacture of orzo blankets ASAP.)

I decided to cook the orzo risotto style, as opposed to in the traditional manner, because I hoped it would help the results be starchier and creamier—I wanted this to be a cheesy orzo but I didn't want to make a béchamel. (The only dairy in my refrigerator was buttermilk, and that seemed like a gamble.)

Spoiler alert: It works! I used the broth I had in the cabinet, which happened to be vegetable broth. Which for no particularly reason I'm going to disclose that I think vegetable broth tastes just dandy but smells really strange. I'll just leave that little fact here for you even though it's of no use to anyone at all.

I could have roasted the broccoli to give it a little oomph in the flavor department, but I rather liked the way this all came together as a one-pot wonder, and letting it cook slowly in the orzo meant that it kept its bright green color and still turned out tender but toothsome.

I think the red onion is a nice pop of color here, but any sort of onion will work just fine; it was just what I had on hand. I added dried crushed red pepper, but for kids or people who prefer a sort of unadulterated mac and cheese, you can leave it out altogether.

When I posted a shot of this on Instagram last night, the response was swift—I think orzo is just one of those universally beloved things. Who could believe it all came together in less than 20 minutes?

Twenty-two minutes if you stop to open a bottle of wine and pour yourself a glass or three. Which I recommend.

Enjoy!

DSC_2869

Cheesy Broccoli and Orzo "Risotto"

6 cups vegetable broth or chicken broth
2 tablespoons olive oil
½ large red onion, chopped
4 garlic cloves, minced
4 cups broccoli florets
¼ teaspoon salt
¼ teaspoon freshly ground black pepper
Dried crushed red pepper (optional)
1½ cups dried orzo
4 ounces shredded Cheddar cheese
¼ cup heavy cream

1. Bring broth to a simmer over medium heat; keep warm over low heat.

2. Heat olive oil in a large, deep skillet over medium heat; add onions and cook, stirring, until onions are translucent. Stir in garlic; cook 1 minute. Stir in broccoli, and sprinkle with salt, black pepper, and red pepper, if desired. Cook 1 minute.

3. Stir orzo into broccoli, and cook 1 to 2 minutes or until lightly toasted. Ladle about ½ cup broth into pan; cook, stirring constantly, until liquid is absorbed. Repeat with remaining broth, and cook 8 to 10 minutes, adding broth ½ cup at a time as needed until orzo is al dente and broccoli is tender.

4. Reduce heat to low, and stir in cheese and cream. Makes 4 servings.

 
0 comments

*spicy cabbage stir fry with panko-crusted chicken.

DSC_2870


Remember those panko-crusted cutlets I made yesterday? There were five of them, and Mama don't waste. (Well, technically Mama does waste, but Mama feels really pretty guilty about it.)

So Chicken week continues!

I really love cabbage for its freshness and crunch and that impression it gives of bearing healthful goodness. I also like that it is really hardy and long-lasting in the refrigerator, which means you can add it to all manner of things—toss sautéed cabbage into egg noodles and serve with Swedish meatballs, tumble it into stir-fries, or make a delicious slaw to top any number of sandwiches, from hot dogs and hamburgers to Reubens and Cubans—even though it comes as a head the size of your ... well, head, which means you'll be eating it in things for a while.

That's where the leftover makeover comes in handy.


DSC_2873

The only cure for leftovers, I find, is to turn them into something completely different whenever possible.

Monday's flavors were sort of (sort of) a Southern American homage, so I swung the pendulum all the way around last night and made a stir fry. You may think it is MORE THAN A LITTLE strange to put cole slaw in a stir fry, but it helps to know that I prefer my cole slaw super lightly dressed. It's not as though this ended up being a typical slaw with just a little soy sauce stirred in. (Because that might be weird. Or good. I don't know!)

DSC_2866

I did some Internet research on the best way to reheat fried chicken, and the Internet said ... don't. Pretty universally, the prevailing wisdom seems to be that if it's easy to screw up reheating fried chicken, and fried chicken tastes delicious cold, then what would be the point?

Still, I assumed that this cold chicken would be best with cold noodles, and because I wasn't attempting that, I gambled with 20 minutes at 325, and it was just right—heated through and re-crisped on the outside, but not dry on the inside.

I plucked a couple of jalapeños out of the slaw before heating it in the pan, just so they'd retain their crunch and heat. I also stirred in some sriracha to amp up the flavor it might have lost by being, well, leftovers.

Et voilà! A hot, delicious weeknight meal that didn't require another trip to the store, or a stop for convenience food, that didn't taste anything like the previous night's weeknight meal.

Enjoy!

DSC_2874

Spicy Cabbage Stir Fry with Panko-crusted Chicken

¼ small head green cabbage, thinly sliced
1 jalapeño, thinly sliced
2 green onions, chopped
3 tablespoons reduced-fat mayonnaise
2 teaspoons yellow mustard
2 teaspoons white wine vinegar
Salt, to taste
Freshly ground black pepper, to taste
2 tablespoons butter
3 tablespoons olive oil, divided
4 chicken cutlets or chicken breast fillets
All-purpose flour
2 eggs, beaten
Panko
1 cup jasmine rice
4 garlic cloves, minced
2 teaspoons dried ginger or minced fresh ginger
¼ cup low-sodium soy sauce
1 tablespoon fish sauce
1 tablespoon rice wine vinegar
Sriracha, to taste
Garnish: chopped green onions

1. Combine first 3 ingredients in a small bowl. Whisk together mayonnaise and next 4 ingredients; add to cabbage mixture, and stir to combine. Chill until ready to serve.

2. Heat butter and 2 tablespoons oil in a large, deep skillet over medium heat until butter melts. Meanwhile, sprinkle chicken with salt and pepper to taste. Dredge chicken in flour; dip in egg, and dredge in panko. Cook chicken in butter mixture 3 to 4 minutes on each side or until golden brown. Remove to paper towels to drain.

3. Bring 2 cups water to a boil in a saucepan; stir in rice. Cover, reduce heat to low, and cook 20 minutes.

4. Meanwhile, heat remaining 1 tablespoon oil in a large skillet over medium-low heat; add garlic and ginger and cook, stirring, 1 minute or until fragrant. Stir in cole slaw, and cook until cabbage is tender.

5. Combine soy sauce, fish sauce, vinegar, and sriracha in a small bowl. Stir cooked rice into cabbage mixture until rice is dry and toasted; stir in soy sauce mixture.

6. Top stir fry with chicken, and garnish, if desired. Makes 4 servings.


0 comments

*buttermilk biscuit chicken sliders with green slaw.

DSC_2866

Sometimes I think my brain is a little like a front-load washing machine—thoughts just kind of tumble around in there, and I never know which one is going to slam into the door like a red sock.

Which is to say that this was inspired by a lot of little things, something of a stream-of-consciousness dinner-planning process. (Scattered and nonsensical! Who, me?)

I don't cook with meat all that much on the Woodside, mostly because it's hard to use it all up before it goes bad if you're a party of one, and I have unhealthy levels of freezer fear. But occasionally I do have a craving, and I like to indulge it when there's something I know I really want. (In this case, chicken; the package I found at the store had five pieces in it, so look for this to be the week o' the bird.) I cooked it my favorite way, which is to say cutlets crusted in panko and pan-fried, a procedure I return to a lot because I find it to be foolproof.

And SPEAKING OF foolproof, I landed on making biscuits because I am a terrible baker and I know that I need practice/confidence, and I found this recipe over at Tracey's Culinary Adventure, and her biscuits are beautiful. Seriously, go look at them. I'll wait. (It's important to the narrative.)

Anything strike you as unusual, when you compare her biscuits to mine?

Yeah, I don't know what happened. I did follow the recipe to the letter, although when my biscuits neither rose nor browned, I thought maybe I'd just leave them in the oven a little longer.

Which was a mistake when I subsequently forgot they were in there and murdered them.

BUT these were a fail for me before I baked them into little hockey pucks, which returns me to my earlier assertion that I am just really very bad at baking.

Still, I live alone and I'm not made of money, so I shrugged off their density and dryness and soldiered on, with a green slaw (cabbage + green onion + jalapeños) and a nice, ripe tomato slice in honor of the shoulder season for Alabama tomatoes.

The slaw was delicious; I chopped up a second chicken breast and another tomato slice and stirred into the cabbage mixture for an at-work lunch today.

DSC_2867

And this morning, before work, I layered a biscuit with Cheddar and tomato and fried egg and sopped up the yolk with the butter bomb and took a slightly strange-looking photo in the slightly strange-looking light of the Woodside kitchen. If you are a better baker than I (and you are, trust), give this one a go, and maybe tell me where you think I went wrong.

Enjoy!

DSC_2878

Buttermilk Biscuit Chicken Sliders with Green Slaw

¼ small head green cabbage, thinly sliced
1 jalapeño, thinly sliced
2 green onions, chopped
3 tablespoons reduced-fat mayonnaise
2 teaspoons yellow mustard
2 teaspoons white wine vinegar
Salt, to taste
Freshly ground black pepper, to taste
9 oz (about 2 cups) all-purpose flour
2½ teaspoons baking powder
½ teaspoon salt
5 tablespoons cold unsalted butter, cut into small cubes
¾ cup cold buttermilk
3 tablespoons honey
2 tablespoons olive oil
2 tablespoons butter
5 chicken cutlets or chicken breast fillets
All-purpose flour
2 eggs, beaten
Panko
1 tomato, sliced

1. Combine first 3 ingredients in a small bowl. Whisk together mayonnaise and next 4 ingredients; add to cabbage mixture, and stir to combine. Chill until ready to serve. 

2. Preheat oven to 400 degrees. Line a baking sheet with parchment paper.

3. In a large bowl, whisk together the flour, baking powder, and salt. Add butter cubes, and use a pastry cutter (or your fingertips) to cut in the butter until the pieces are no bigger than peas. (The mixture should resemble coarse meal.) Place bowl in refrigerator; chill 10 minutes.

4. Meanwhile, whisk together the buttermilk and honey in a measuring cup. Add to flour mixture, and stir gently just until  dry ingredients are moistened.

5. Turn dough out onto a lightly floured surface, and knead gently 3 to 4 times to bring it together. (The dough may still be a little crumbly.) Roll dough into a 9- x 5-inch rectangle about ½ inch thick. Fold dough into thirds like a business letter. Roll dough again into a 9- x 5-inch rectangle about ½ inch thick, and again fold it into thirds like a letter. Roll dough out a third time to ¾ inch thick. Using a 1¾-inch round cutter, cut biscuits from dough, and place about 1 inch apart on prepared baking sheet.

6. Bake 11 to 12 minutes, or until biscuits rise and tops are golden brown. Transfer to a wire rack to cool.

7. Heat butter and oil in a large, deep skillet over medium heat until butter melts. Meanwhile, sprinkle chicken with salt and pepper to taste. Dredge chicken in flour; dip in egg, and dredge in panko. Cook chicken in butter mixture 3 to 4 minutes on each side or until golden brown. Remove to paper towels to drain.

8. Cut chicken cutlets in half crosswise. Slice biscuits in half horizontally, and layer with chicken, slaw, and tomato slices. Makes 6 to 8 servings. 

 
2 comments

*stovetop red beans and rice with pimiento cheese.

9592364892_70f61fa43d_o

Look at that teeny tiny skillet! Isn't she terrific? She's one of a short stack of cast iron pans of varying sizes (including an awesome griddle pan) that my grandmother gave me. They sit in the corner of my kitchen unused for the most part, because they're beautifully seasoned and I'm terrified of ruining them somehow. As a rule I get about halfway through the instructions for seasoning cast iron and think, "Nope! Definitely would screw that up!" and hope my sweet gramma isn't somewhere rolling her eyes at me.

She is definitely somewhere rolling her eyes at me.

A couple of weeks ago I went to a friend's house to watch Breaking Bad. (Because from a television standpoint it's the best thing this side of The Golden Girls—only, you know, with harder drugs. Rose only went to rehab because she was addicted to muscle relaxers.) I never think much about other people cooking for me because I so enjoy being the cook-er that I rarely considering being the cooked-for. But Julie made this amazing, can't-get-it-off-my-mind red beans and rice. It was perfectly spicy, and the texture was spot on: creamy and smooth but chock-full of beans (yum) and Cajun sausage (double yum).

Red beans and rice is the kind of dish that hits you in all the right comfort food spots—it's akin to a casserole, which wins because it has that little-bit-of-everything feel. In this case, there is thick, starchy broth, bright heat, meaty bits, and fragrant carbs.

I do believe that's everything. 

9589598601_77f3edea4c_o

Julie made hers in a slow cooker, and trust me when I tell you that's the ideal way to go. But if you are like me and have fewer mouths to feed and an inability to think beyond five minutes from whatever time it is, this is an easy one to simmer on your stovetop and come out with a delicious weeknight facsimile. You also get the benefit of browning off the sausage, which I love because it gives it a crispy exterior that's a lovely contrast to the rice and beans.

One thing Julie did that I forgot to do but highly suggest, is to mash up some of the beans. This thickens and silkifies (sure, could be a word) the "stew" part of the mix but leaves whole beans, too, for stick-to-your-ribs toothsomeness.

One thing Julie did NOT do but that I also highly suggest, is to top the whole thing off with a sensible (ahem) dollop of pimiento cheese.

9592453982_0937f74104_o

It was mentioned to me that this could be considered "weird," but try it try it try it I promise it's a lovely marriage. Think of it as putting cheese on your chili, but then remember that this mixture introduces a vinegary tang from the pimientos. I scooped it out when it was well chilled, so that it slowly melted into the beans and became sort of a cheesy surprise in every bite.

The easiest way to accomplish this feat of strangeness is to use your favorite prepared pimiento cheese, but please make sure it was made by hands that freshly grated it, if you can. Store-bought pimiento cheese probably isn't going to give you the same payoff as the more artisan variety. (This here was given to me by my sister-in-law, who purchased it from a local vegetarian restaurant/dive bar in town. It was just right.)

So here's to being weird!

OK, that's enough eye-rolling, Grandma.

Enjoy!

9589631669_5138a7d2f9_o

Stovetop Red Beans and Rice with Pimiento Cheese

1 tablespoon olive oil
6 ounces andouille sausage
1 small green bell pepper, diced
½ medium onion, diced
½ teaspoon kosher salt
½ teaspoon black pepper
¾ teaspoon cayenne pepper
1 tablespoon cajun seasoning
3 cups fat-free, low-sodium chicken broth
1 (8-ounce) can tomato sauce
2 (16-ounce) cans low-sodium kidney beans, drained and rinsed
Hot cooked rice
Prepared pimiento cheese
Garnish: chopped green onions

1. Heat olive oil in a stockpot over medium heat. Add sausage; cook 5 minutes or until well browned. Remove sausage from pot with a slotted spoon, reserving drippings in pot. Stir in bell pepper and onion; cook until vegetables are softened. Stir in salt and next 3 ingredients; cook 1 minute or until spices are fragrant. Add chicken brought and tomato sauce, stirring to loosen browned bits from bottom of pot. Stir in beans; cover, reduce heat, and simmer 20 minutes.

2. Bring mixture to a boil and cook, uncovered, 20 more minutes or until liquid is slightly thickened. Stir in sausage, and cook until heated through.

3. Divide rice among serving bowls; top with bean mixture, and dollop with pimiento cheese. Garnish, if desired. Makes 4 to 6 servings.


search.

foodgawker

my foodgawker gallery

archive.

followers.

I am a work in progress. I perpetually need a hair cut. I'm totally devoted to my remarkable nieces and nephew. I am an elementary home cook and a magazine worker bee. (Please criticize my syntax and spelling in the comments.) I think my dog is hilarious. I like chicken and spicy things. I have difficulty being a grown-up. Left to my own devices, I will eat enormous amounts of cheese snacks of all kinds.

.