Search

Content

1 comments

*sausage–brussels sprouts penne with creamy goat cheese sauce.

DSC_2895-1

Happy Thanksgiving and Hanukkah week, everybody!

Here on the Woodside, we're celebrating with a one-day work week, the traditional parade-family-meal triumvirate on Thanksgiving Day, and putting up the Christmas tree on Friday—which also happens to be my birthday, but it's a boring one this year, so I'm going to celebrate by bringing out the twinkly lights because they're my favorite.

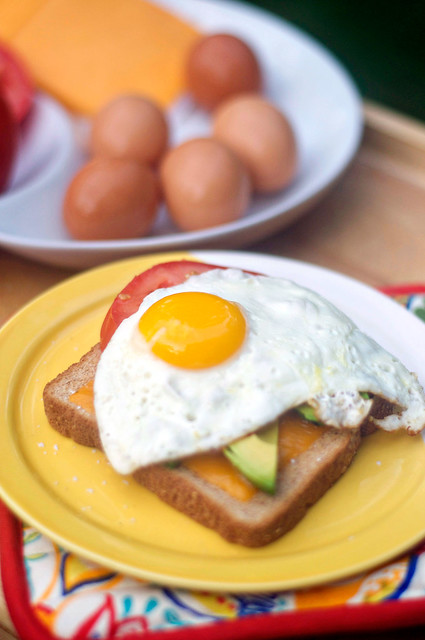
In typical fashion around these parts, I volunteered to be responsible for some bits and pieces where the Thanksgiving meal is concerned—because being in the kitchen is also my favorite—and I have done zero planning. I went to the grocery store yesterday and got a pretty good preview of the punishment I'll have to endure for my procrastination.

Partly I wait until the last minute to plan because I am a notorious second-guesser, so I'm much better off making impulse decisions where dishes are concerned. But almost without fail, what ends up happening is that I return to a recipe I've made many times before. Especially when feeding a crowd, I have to agree with Ina Garten's mantra that it's much less stressful to stick to something you already know works. That way you have calm confidence, and the people you're feeding have great food.

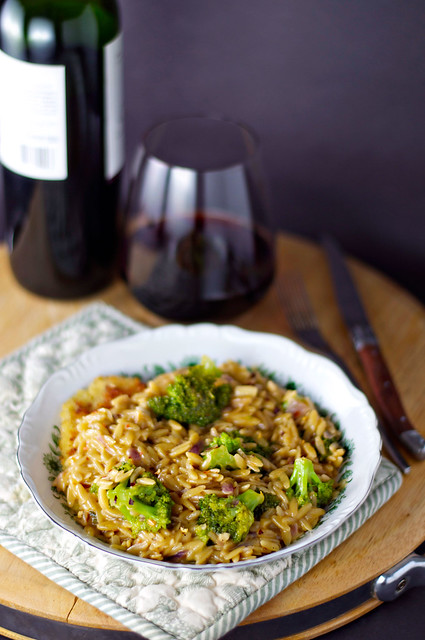
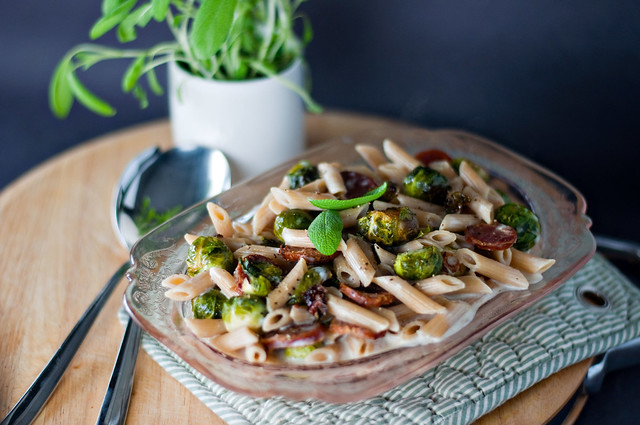
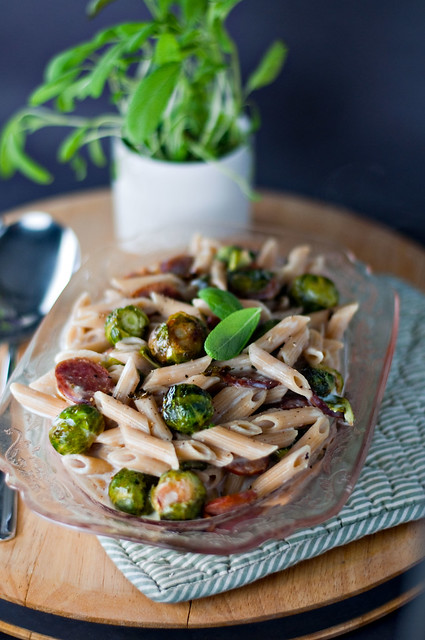
This dish is one of those standbys for me, something I've made and modified so many times I don't even remember where I originally discovered it. It demonstrates my favorite formula for comfort food: savory heat, hearty greens, salty cheese, and—naturally—pasta.

It's a simple and easy weeknight meal, which is another reason it's become a standby, but I'm putting it here because it would also make a great way to reuse those Thanksgiving leftovers: Just stir in chopped leftover turkey in place of the sausage, and whatever Brussels sprouts you have remaining from your holiday table. After that it's just a matter of boiling the pasta and stirring through that creamy goat cheese.

After lots of trial and error with this dish, I've discovered that the easiest way to approach the Brussels sprouts and sausage is to roast them in the oven together. (It also helps the sprouts take on some of that lovely, spicy sausage flavor.) Because the little cabbage heads can sometimes be unpredictable in terms of how long they need to roast, slice your sausage a little bit thicker than you see here—you want it to come out juicy and substantial with just a little crispiness around the edges; you don't want jerky.

When it comes to goat cheese, I think the more coarsely ground black pepper, the better. In that same vein, taste often as you're seasoning—some goat cheese and sausage varieties contain more salt than others, so you don't want to overdo it.

I added a few sage leaves to the milk early on in the process, but then strained it out—that gave things a subtle woodsy flavor and aroma without the punch in the taste buds I sometimes think sage can be. Aggressive little herb.

I hope you try this dish and return to it as often as I have over the years. And I hope you have as many things to be thankful for as I do. And if you're celebrating Thanksgiving at your house tomorrow, I hope you're a lot more prepared than I am.

Enjoy!

DSC_2890-1

Sausage–Brussels Sprouts Penne with Creamy Goat Cheese Sauce

1 pound Brussels sprouts, trimmed
Olive oil
Salt
Freshly ground black pepper
Dried crushed red pepper (optional)
2 links andouille sausage, sliced
2 cups whole milk
½ white onion, very finely chopped
4 garlic cloves, minced
6 sage leaves
2 tablespoons butter
2 tablespoons flour
6 ounces goat cheese
8 ounces dried whole wheat penne

1. Preheat oven to 425 degrees. Line a baking sheet with aluminum foil.

2. Place Brussels sprouts on prepared baking sheet; drizzle lightly with olive oil, and sprinkle evenly with salt, black pepper, and red pepper, if desired. Add sausage; roast 20 to 25 minutes or until sprouts are tender and sausage is golden brown.

3. Meanwhile, stir together milk, onion, garlic, and sage leaves in a medium saucepan over medium-low heat until just barely simmering. (Do not boil.) Cook, moderating temperature if necessary, 15 minutes. Drain mixture through a fine, wire-mesh sieve, discarding solids.

4. Melt butter in a skillet over medium heat; whisk in flour and cook 1 minute. Slowly whisk in hot milk, and cook until mixture thickens slightly. Reduce heat to low, and whisk in goat cheese until smooth. Season to taste with salt and black pepper, and keep warm.

5. Cook pasta in boiling salted water according to package directions. Stir together hot pasta, roasted Brussels sprouts and sausage, and goat cheese sauce. Top with additional black pepper, if desired. Makes 4 servings.

 
0 comments

*focaccia.

DSC_2891

It is not a well-kept secret that I can't bake.

For some reason, from the start of every attempt, my confidence wavers, panic sets in, and my brain shifts firmly into the off position. In my mild defense, every time I feel I've followed the directions to the letter, somehow things do not turn out as they should.

Fortunately in my case, this isn't a devastating handicap—baked goods are not generally as high on my list as, say, cheese. Or pasta.

Though to be fair, I am not sure I could make either of those things, either.

Flour flummoxes me. I think I'm always using too much or too little, and I cannot measure it without simultaneously getting it all over my floor, countertop, and person.

I don't know exactly what is meant by "mix just until combined," but it's a veritable guarantee that if I pour any sort of batter into any sort of pan, there's going to be a glump of dry ingredients at the bottom of the bowl.

My oven only has two speeds: undercooked and probably dangerous in the middle, or dry and dense enough to make a nice homebuilding material.

But by far my greatest nemesis is yeast. What do you mean, "put in a warm place (free from drafts)"? What do you mean, "add warm water"? WHAT IS WARM?

Luckily I am a fact-checker by trade, and I am not one to let a stinky little microorganism get the best of me. So I got me to the Google, and learned a few things.

A) Warm water = somewhere between 105 and 110 degrees. Yes, I used a thermometer to measure it; I'm not a wizard.

B) A warm place = well, frankly, a lot of things. Based on the Internets, people have had to imagine all sorts of locations for proofing breads and pastries, everything from the top of the refrigerator to the inside of the clothes dryer. I used two of the simplest suggestions I could find (my dryer is outside in an uninsulated room, so that wasn't going to work): Place a cup of water inside the microwave, and heat until boiling—this worked when the dough was in the mixing bowl—and place a pan of water in the lower half of the oven, then preheat the oven to 200 for five minutes—this worked while the dough proofed on the sheet pan.

And finally, if there's one thing I know about having two left feet in the kitchen, it's that it's best to start simple. I decided to try Anne Burrell's focaccia recipe, because I had the good fortune to have watched her prepare it on her show. (She made it look so easy!)

Things I learned: Baking is a patient person's game. (I believe we just discovered the root of my failures.) There's a lot of hanging around and waiting in bread-making, while you let the yeast do its job. Baking is a lot about going by feel. That takes practice, which I still need—I'm not sure if my dough was too tacky or too dry, but I didn't exactly get the fluffy center I hoped for.

HOWEVER, the dough rose successfully twice (!) and the finished product was super delicious, even if it had a slightly chewier texture and slimmer profile than I was aiming for.

DSC_2884

It made for a delicious BFD (breakfast for dinner, potty mouth)—eggs and soldiers, served up very simply with a chai latte, six-minute eggs (get that recipe here), and seconds-before-burning bacon. Which is the only way to make bacon.

The next day, my focaccia experiment made for a fabulous three cheese/bacon panino, and I was doubly sold on the miracle of making your bread yourself.

Baking! I done it! And I think I'm going to do it again. You should, too!

Enjoy!

DSC_2895

Focaccia
adapted from a recipe by Anne Burrell
1¾ cups warm water (between 105 and 110 degrees)
1 package active dry yeast
1 tablespoon sugar
5 cups all-purpose flour
1 tablespoon kosher salt
1 cup extra virgin olive oil, divided
Coarse sea salt

1. Combine first 3 ingredients in a small bowl. Place bowl in a warm place 15 minutes or until yeast bubbles and is aromatic.

2. Combine flour, kosher salt, ½ cup olive oil, and yeast mixture in the bowl of an electric mixer fitted with a dough hook at low speed until dough comes together. Increase mixer speed to medium, and beat 5 to 6 minutes or until dough is smooth and soft. (Sprinkle with flour if dough is overly sticky.)

3. Transfer dough to a lightly floured surface, and knead by hand 1 or 2 times. (Sprinkle with flour if dough is overly sticky.) Coat mixer bowl lightly with olive oil, and return dough to bowl. Cover with plastic wrap and place in a warm place at least 1 hour or until dough doubles in size.

4. Coat baking sheet with remaining ½ cup olive oil. Transfer dough to prepared baking sheet, pressing out to fill pan. Turn dough over, and continue to stretch dough to fit baking sheet, spreading with your fingers to make holes all the way through dough. Place baking sheet in a warm place at least 1 hour or until dough doubles in size.

5. Preheat oven to 425 degrees. Sprinkle dough liberally with coarse sea salt, and drizzle lightly with olive oil. Bake 25 to 30 minutes or until golden brown. Let cool before serving. Makes 10 to 12 servings.

 
0 comments

*seared filet with tomato and fresh mozzarella.

DSC_2926

You know that warm, contented, even feeling you get when you do something for someone else? It can be anything—offering a ride to the airport, taking care of a pet, loaning your wedges when someone has nothing to wear with her new pants—but by far the fastest and easiest way to get there is by cooking. By and large, people love to have someone make a meal for them. It's comforting and stress-relieving and generous, and those are all wonderful feelings to both give and receive.

But as it turns out, you can (and I would argue, ought to) achieve the same sense of happy, self-high-fiving bliss when you cook for one.

There are a lot of rules out there that are alleged to improve the lives of single people: Eat at a proper  table. Don't eat in front of the TV. Don't dip pretzels in the tub of cream cheese and call it dinner.

I break all of those rules. Stop judgin' me, Internet advice columns. I like my couch and my Big Bang Theory and my sleeves of saltines, and I shan't apologize for it.

But the truth is that there are a lot of perks to being the only one in the house who brings home the bacon, shall we say. No one else gets to say, "I don't like mushrooms" or "Do you have to put avocado on everything?" or "Sweetie, I love you and I love turkey sandwiches, but I think this is bordering on obsession and we might need to call in some medical professionals if you don't eat something else."

It also means that, because you aren't trying to please vast numbers of all manner of people, every now and again even your recession-strained budget will let you indulge a little.

So yes I did buy this $14 filet mignon on a Tuesday night. I ate half of it with this pretty little wedge of iceberg and then turned the other half into a steak salad for lunch the next day, which technically makes this a $7 steak dinner, which technically makes this worth every penny.

The steak is loosely based on Ina's method: hot pan, sear, roast, rest. Grills are great if that's your bag, but I'm unlikely to fire up some charcoal on a weeknight when I'm just cooking for me. (Or ever, really. Fire is hot and I am clumsy.)

When I decided to make this a Caprese steak, I forgot one teensy little detail: It's late October. I took a chance and got super lucky with what has to have been the absolute last of the good late-summer tomatoes. I didn't have high hopes for it given that it had lost some of that plump cheerfulness you like to see in an Alabama mater, but when I sliced into it it was absolutely perfect.

There's a decent chance I stood at the stovetop and seared the steak with one hand while I jammed slices of juicy tomato and cold fresh mozzarella into my mouth with the other.

Reducing the balsamic is just the easiest thing in the world to do; you leave it to bubble away in a pan and let your nose tell you when it's syrupy and thick. (Wait for things to smell sweet and smoky, but do keep a half an eye on the pan so it doesn't burn!) I could even have let it reduce a bit further in this case, but I was hungry. You can see that it cascaded off the hot, melty cheese, but pooled into a dark, sticky puddle around the steak. Ain't nothin' wrong with that.

I was lazy with my wedge salad, because that's exactly what a wedge salad allows you to be. A hunk of iceberg, a drizzle of dressing, and a smattering of store-bought bacon bits were all I needed. A proper wedge salad would benefit from thick chunks of blue cheese, crispy pieces of real bacon, and bits of chopped tomato, but I had piled so many layers of goodness onto my steak that I wanted to keep things simple.

A simple salad. A splurge on a steak topped with gooey, salty cheese and sweet, lightly roasted tomato. Big, bold flecks of freshly ground black pepper all over everything. Make it for you and yours some Tuesday soon! 

Or, better yet, wait until they're out of the house and make it all for you.

Enjoy!

DSC_2925

Seared Filet with Tomato and Fresh Mozzarella

¼ cup balsamic vinegar
1 (10-ounce) filet mignon
Kosher salt
Freshly ground black pepper
1 tomato slice
2 fresh mozzarella cheese slices

1. Preheat oven to 400 degrees. Heat a grill pan or cast iron skillet over high heat 5 to 7 minutes or until very hot.

2. Meanwhile, pat steak dry with a paper towel, and sprinkle with kosher salt and black pepper on all sides. Cook steak about 2 minutes on all sides or until evenly seared (about 10 minutes total).

3. Top steak with tomato and mozzarella; place pan in oven, and cook until a thermometer inserted in thickest portion of the steak reaches 125 degrees (for medium-rare).

4. Remove steak from pan, cover loosely with aluminum foil, and let rest 10 minutes.

5. Place balsamic vinegar in a small saucepan over medium-low heat. Cook, stirring occasionally, until vinegar has reduced by half. Drizzle over steak before serving. Makes 1 serving.

 
1 comments

*wasabi shrimp hand roll bowl.

DSC_2874

I'm kind of a huge pain to go to a sushi restaurant with.

This is in part because I have an inexplicable distaste for scallops, lobster, and crab, and there is a lot of crab in sushi rolls.

(Don't even get me started on imitation crab. Or, for that matter, cream cheese, which is a blight on the textural delight that sushi rolls are meant to be.)

I do, however, love tuna in my sushi in absolutely any incarnation. My friend Jeannie and I used to order hamachi nigiri as dessert at our favorite local sushi spot. Which happens to also be the place that I discovered the spicy tuna hand roll.

It might surprise some people to know that my Deep South hometown has a fair number of fair sushi counters, but I daresay Jinsei is the best. Unfortunately, these days I mostly drive by and stare at it longingly, because I can't afford to eat there on the regular.

The hand roll isn't on the menu, but if you ask for it they'll wrap it right up for you on the spot. Hand rolls aren't traditional log rolls of sushi; they are cones of nori wrapped around all imaginable kinds of goodness. They got their name because they were originally meant to be eaten immediately, passed from the sushi chef right into your hot little hands, and then promptly devoured.

Jinsei's spicy tuna hand roll is a soft sheet of seaweed curled up with a little bit of sticky rice, cucumber, avocado, daikon, and spicy tuna (generally a mix of the fish with some mayo and sriracha). Sometimes it was garnished with a little seaweed salad; sometimes a smattering of sesame seeds. This one is really at the chef's discretion.

Alas, sushi-grade tuna is simply not a realistic aspiration for a weeknight meal on the Woodside. It requires enough funds and enough of a commute to be a special occasion item. Instead, I tried to just grab at those flavors and textures that I love without aiming very closely at all to the original inspiration.

In an effort to lighten things up I omitted the rice here, but it would be a delicious addition. And I will admit that I purchased pre-made coleslaw mix at the store because I am only one lady and I can never, ever finish an entire head of cabbage.

Nor would anyone appreciate that, I'd wager.

Ahem.

Because I can't keep my grubby little hands off anything I see in the store that's new, I'd bought these seaweed snacks a few days before, and they turned out to be a nice little taste of the ocean to energize those store-bought shrimp. Nothing really says "sushi" more than nori, and these are very lightly salty and flavored with sesame. (When I grabbed that link I discovered that there is also a wasabi version, which my store sadly does not yet stock!)

These were medium shrimp. The larger ones in my market were head-on, and I just didn't have the wherewithal to tackle that task on a Tuesday night. These were only nominally medium shrimp, when they should have perhaps been labeled shrimpy shrimp. 

DSC_2872

In other words, they were leetle guys. I poured the whole shebang into my grill pan, marinade and all, which let the soy sauce get syrupy and slightly sweet, a nice counterpoint to the BANG of wasabi.

I'm going to call for anywhere between 1 and 3 tablespoons of sriracha here—I went with three, and it was powerful hot. Just taste taste taste and see where your magic number is.

Enjoy!

DSC_2867

Wasabi Shrimp Hand Roll Bowl

1 (14-ounce) bag coleslaw mix (cabbage and carrots)
3 green onions, chopped
¼ cup light mayonnaise
1 to 3 tablespoons sriracha
½ pound raw medium shrimp, peeled and deveined with tails on
2 tablespoons low-sodium soy sauce
1 tablespoon wasabi paste
1 tablespoon rice vinegar
¼ teaspoon ground ginger
Sesame seeds
1 avocado, chopped
Garnish: sliced nori, chopped green onions

1. Combine first 4 ingredients in a medium bowl; set aside.

2. Whisk together soy sauce and next 3 ingredients in a medium bowl until well combined; add shrimp, tossing to coat. Marinate 10 minutes.

3. Grill shrimp in grill pan over medium-high heat, 1 to 2 minutes on each side. Pour marinade over shrimp during last minute of cooking. Place shrimp and marinade in a medium bowl, and toss with sesame seeds.

4. Divide reserved spicy coleslaw among 4 serving bowls. Top evenly with shrimp and avocado, Garnish, if desired. Makes 4 servings.

 
0 comments

*pollo adobo (smoky jalapeño chicken).

DSC_2877

There's a Mexican restaurant in town that is fairly close to the apartment I used to live in, and about halfway between that apartment and work, which means I was there quite a bit. (You know, before I decided to branch out and eat at other ... Mexican restaurants.)

My people eat a lot of Mexican food.

It was just the right combination of cheap and trashy, but the margaritas were always on special, the salsa was jammed with cilantro, and the food gave the impression that someone in the kitchen really cared about what s/he was doing.

For a while the restaurant closed, when someone tried to turn the strip mall it's in into residences, but when that venture failed it miraculously returned! Unfortunately it's been a little fancified, replacing some of its lovable cheap trashiness with dimmer lighting and the rumbling cacophony of Other People's Children, and we haven't made it to the new incarnation with the same frequency. When the magic of sticky tables and puckery margarita mix and green carpet–covered floors has passed, it has passed.

Still, even in a town with a Mexican restaurant on nearly every corner (and Birmingham certainly applies as one of those cities), it can sometimes be difficult to find menu items outside of the box of the usual tacos, burritos, and nachos—also known as the holy trinity, amen.

I am not here to undermine the many, many wonderful attributes of tacos and burritos and nachos, but sometimes it is nice to break free of those flavor profiles. And the dish I always ordered at Mexico Lindo was the pollo adobo (which seems to have been renamed the pueblo lunch): "black beans topped with chicken in hot adobo, onions & queso fresco."

At Lindo they serve the dish in a wide, shallow bowl, lined with a flour tortilla to soak up the beans and the smoky broth, and topped with a light sprinkle of cheese and charred green onions.

There are a lot of alterations to that basic idea here—I am, as you can see, not a girl with a talent for light sprinkling where cheese is concerned. That's Monterey Jack, too, because my market didn't have any queso fresco. I also shredded the chicken, as opposed to crisping chunks of it on the flat top, the way it's served in the restaurant version. Because I'd gotten home from work pretty late this day, I picked up a rotisserie chicken and shredded it into the broth, but really any kind of protein you like would work here. (I have a dream that involves chargrilled shrimp.)

There's avocado here because I love it, and the signature grilled onions. I just placed mine in a dry grill pan until they developed some nice marks, the white ends got tender, and the green tips turned crispy.

I would add two chipotle peppers first, simmer, and then taste. If you like things a little smokier/spicier, feel free to add more! I dipped in about a teaspoon of extra adobo sauce at the end for a little kick. You can season as you go, too—I try to keep an eye on my salt intake when I'm cooking for myself, so I seasoned at the end so that I didn't layer too much on as I went. Start with 2 cups of water, and then add if you feel like things start to dry out. I started with 3 and found the results slightly soupier than I'd planned on.

I like to dip the green onions into the sauce and then eat them like Twizzlers, but for leftovers I simply chopped them up and stirred them in. They add just the right hit of mild, grassy crunch for the warm broth, creamy beans, hearty chicken, and smooth avocado.

¡Buen provecho!

DSC_2874

Pollo Adobo (Smoky Jalapeño Chicken)

2 cans reduced sodium black beans, drained and rinsed
1 tablespoon olive oil
½ red onion, finely chopped
3 garlic cloves, minced
1 teaspoon dried Mexican oregano
1 bay leaf
2 chipotle peppers in adobo sauce, finely chopped
1 teaspoon adobo sauce
2 rotisserie chicken breasts, shredded
1 bunch green onions, trimmed
4 taco-size flour tortillas
Salt, to taste
Black pepper, to taste
1 avocado, sliced
4 ounces Monterey Jack cheese, shredded

1. Place half of beans in a food processor with about ¼ cup water; puree until smooth.

2. Heat oil in a stockpot over medium heat; add onion, and cook 5 minutes or until translucent. Stir in garlic, oregano, and bay leaf; cook 1 minute. Stir in chopped chipotle peppers and adobo sauce; cook 30 seconds. Stir in chicken, coating with sauce. Stir in whole beans, reserved bean purée, and 2 cups water; bring to a boil, cover, and simmer 20 minutes or until slightly thickened. (Stir in additional water if mixture becomes too thick.)
 
3. Meanwhile, heat grill pan over medium heat until hot. Grill green onions, turning occasionally, 8 minutes or until tender. Remove from heat, and set aside.

4. Season chicken mixture with salt and black pepper to taste; stir in additional adobo sauce or chipotle peppers, if desired. Remove bay leaves, and discard.

5. Heat tortillas in a microwave oven on HIGH 10 seconds. Line serving bowls with tortillas, and top with chicken mixture. Top evenly with cheese, avocado slices, and reserved grilled green onions. Makes 4 servings.

 
4 comments

*beef-and-lentil stew with romano potato puffs.

DSC_2878

This is sheer comfort food, my people.

But first, I feel compelled to do a little proppy shout-out: My sister got me that bangin' orange spoon (part of a colorful set I adore); the seersucker fabric and the Anthropologie canister (bringing my total canister count to nine, because I am insane) were loot from Coastal Living prop sales; and as a last-minute thought because my "living herbs" thyme was attached to a healthy-but-ugly root ball, I shoved it into a beautiful gold mortar from my friend Jenny. The board was a hand-me-down from my dad, and the bowl is of course (of course) a treasured gift from my gramma.

And that little commercial break was courtesy of the fact that every piece reminds me of a person I love or a fond memory, even if that fond memory was just buying something pricey for a sweet sweet deal.

Now, back to the comfort food!

I wasn't in any particular need for comfort last night, for which I am grateful, but it was officially October, and I wanted something that said, fall is here even if the temperatures outside still hover in the late-summer region.

This also was originally intended to be vegetarian, but something about the super-lean beef just called out to me. It's simple enough to just omit and have a lovely meat-free option if that's your druthers. And speaking of super-lean, this beef was just 7 percent fat, so I had to add a little oil to the pan before sautéing my veggies. If your beef is chunkier, you can just drain all but a tablespoon or so of the fat away, and then use that for even meatier flavor.

You can simmer the lentils and vegetables in water if you like, but I used beef broth in this case. If you follow my lead, go really easy on the salt until everything has had a chance to cook completely. It can be tough to judge the saltiness of the broth you're using before then. After that, you can just salt to taste!

I pureed about half the soup with my immersion blender before I stirred the beef in. I liked the thickening effect, but still having some bite to the lentils. It's a completely optional step, though—this will taste lovely either way.

The potato puffs (hat tip to my friend Julie, who gave me the alternative to calling them "balls") were cheesy, herby little clouds that melted into the stew. You just want to put them into the pan over a gentle heat and let them develop a nice golden brownness on one or two sides—they're delicate, so they can fall apart in a heap if you try to move them around too much. And keep an eye on them: When they are just warmed through and kissed with butter, they're perfect.

It occurred to me after I inhaled a bowl of this in less than a minute or so that it's really almost a deconstructed shepherd's pie—there's the hearty meatiness and the stick-to-your-ribs veggieness and the earthy herbiness and, well, potatoes. If you're on the go, you can serve the stew with whatever quick potatoes you like. Just make sure they're kissed with butter, obvs.

Just before I plated this up (and I absolutely love it when this happens), I decided there was something about the symmetry of the potatoes that was bugging me, so I plopped a big old dollop of sour cream in the middle out of nowhere. When it was time to eat, I realized that it's absolutely essential to the flavor here—tangy and bright and cooling and perfect with the potatoes. So if you do decide to replicate this for dinner this week, don't omit the sour cream! It's just that extra oomph that's totally worthwhile.

I had a little sour cream in my fridge at home, which is how that impromptu decision came to be made, but other than a few cloves of garlic I bought everything else at the store, and came out with at least six servings for less than $20. Healthy, delicious, and smart: jackpot!

Enjoy!

DSC_2885

Beef-and-Lentil Stew with Romano Potato Puffs

1 pound extra-lean ground beef (93% lean)
Kosher salt
Freshly ground black pepper
1 tablespoon canola oil
1 cup diced yellow onion
½ cup diced carrot
½ cup diced celery
4 garlic cloves, minced
1 cup dried lentils
1 teaspoon dried crushed red pepper
6 fresh thyme sprigs
1 bay leaf
4 cups low-sodium, fat-free beef broth
Romano Potato Puffs (recipe below)
Garnishes: sour cream, fresh thyme leaves

1. Place beef in a stockpot over medium-high heat; sprinkle with kosher salt and black pepper, and cook, stirring occasionally, 5 minutes or until browned and cooked through. Transfer beef to a bowl, and set aside.

2. Return pot to stove over medium heat; add canola oil, onion, and carrot. Cook 3 minutes or until onions are softened. Add celery and garlic, and cook 2 more minutes. Stir in lentils and next 3 ingredients, and stir until combined. Stir in beef broth, and bring to a boil. Cover, reduce heat, and simmer 45 minutes or until lentils are tender.

3. Remove thyme stems and bay leaves from lentil mixture. Puree about half the lentil mixture using an immersion blender (or transfer a few cups to a traditional blender, and puree until smooth). Stir in reserved beef until heated through. Serve stew with Romano Potato Puffs, and garnish, if desired. Makes 6 to 8 servings.

Romano Potato Puffs

2 medium russet potatoes, chopped
¼ cup shredded Romano cheese
Salt, to taste
Black pepper, to taste
Fresh thyme leaves (optional)
1 teaspoon olive oil
1 teaspoon butter

1. Place potatoes in cold water to cover in a medium pot; bring water to a boil and cook about 12 minutes or until potatoes are fork-tender. Drain potatoes well and return to pot.

2. Mash potatoes with cheese and salt and pepper to taste. Stir in thyme, if desired. Shape mixture into 1-inch balls. (Mixture will be dry.)

3. Heat butter and oil in a small skillet over medium-low heat until butter is melted. Cook puffs in butter mixture 1 to 2 minutes or just until heated through and golden brown on 1 or 2 sides. (Handle very carefully when turning puffs in the pan.) Serve immediately. Makes 6 to 8 servings.

 
4 comments

*slow cooker thai chicken and rice.

DSC_2881

I had every intention of beginning this post with, "A few months ago, I pinned ... " And then I revisited my Pinterest yum board and realized I pinned this recipe a year ago. Which is just proof that I have no concept of time and good lord where did 2013 go?

When I pinned this recipe a year ago, I commented that it would be a great thing to try for my first attempt at slow cooking, should I ever procure a slow cooker.

And then I did procure a slow cooker, a Christmas gift from my dad and his husband, almost a year ago, and I developed an unhealthy fear of ... cooking things slowly.

Partly I think that's because I am not really familiar with slow cooker recipes, so I didn't know how to recognize a good one when I saw one, partly because I'm generally more a fan of recipes that have lots of fun but easy, therapeutic steps, and partly because I have a healthy fear of burning my house down.

Yes I know that you are statistically pretty unlikely to burn down your house with a Crock Pot, but I've always been a little ahead of the curve, accident-prone-wise.

This past Saturday's forecast called for a rainy half day and lots of people in my life who I count on to entertain me being busy or asleep, so I dragged my wilted Friday afternoon self to the grocery store and prepared for my maiden voyage.

Personally, I appreciated the prep work this dish required, even though I understand why the typical Crock Pot dump-and-cook approach is considered extremely valuable among the slow cooker set. What I enjoyed most about my first slow-cooking experience is that I got to do all of the things I like about being in the kitchen—chopping, whisking, mincing, peeling (well, not peeling so much; my knuckle was not the biggest fan of that part; see above re: accident prone)—but not doing the cooking myself made it feel a little bit like a magic trick. Insert ingredients, abracadabra, and presto! Dinner.

I made some adjustments to the original formula—I forgot the coconut milk, so I substituted what I had on hand, which was heavy cream. (Full disclosure: On my tombstone, it shall read, "Here lies K. She forgot one ingredient.) I also don't have access to quick-cooking tapioca, so I subbed cornstarch as a thickener.

I really liked the tenderness of the chicken and the hint of curry and peanut butter, but after five and a half hours of cooking, some of those the flavors needed a little brightness—the lime stands up beautifully (and only improves as leftovers), but a little sriracha and chopped roasted peanuts give the heat and salt a little boost. For color and life, cilantro comes in super handy.

So big thanks to Love at Home for being my inspiration! I made a big meal with very little effort, and I didn't burn down the house. Just right for a rainy couch-bound day spent testing my mental health by watching too many episodes in a row of The Newsroom.

Enjoy!

DSC_2879


Slow Cooker Thai Chicken and Rice

2 medium onions, thinly sliced
1½ cups sliced peeled carrots (about 3 medium)
1 small red bell pepper, thinly sliced
2 pounds boneless, skinless chicken breasts, cut into 1-inch pieces
¾ cup low-sodium, fat-free chicken broth
3 tablespoons creamy peanut butter
½ teaspoon lime zest
2 tablespoons fresh lime juice
2 tablespoons low-sodium soy sauce
2 tablespoons cornstarch
1 tablespoon grated fresh ginger
3 teaspoons red curry paste
4 garlic cloves, minced
½ cup heavy cream
1 cup frozen peas
Hot cooked jasmine rice
Garnishes: sriracha, chopped roasted peanuts, fresh cilantro leaves 


1. Place first 3 ingredients in a slow cooker; top with chicken. Whisk together chicken broth and next 8 ingredients in a medium bowl until smooth. Pour over chicken and vegetables.

2. Cover slow cooker, and cook on low 5&frac12 hours. Stir in cream and peas; let stand, covered, 5 minutes.

3. Serve chicken mixture over hot cooked rice. Garnish, if desired. Makes 8 servings.

 
0 comments

*cheesy broccoli and orzo risotto.

DSC_2872

Look, Ma! Veggies!

See way there in the back, where the chicken is all snuggled up under the orzo blanket? Yes, that's leftover makeover right there. But the chicken is really just an understudy in this case—the orzo is the star.

(Note to self: Begin manufacture of orzo blankets ASAP.)

I decided to cook the orzo risotto style, as opposed to in the traditional manner, because I hoped it would help the results be starchier and creamier—I wanted this to be a cheesy orzo but I didn't want to make a béchamel. (The only dairy in my refrigerator was buttermilk, and that seemed like a gamble.)

Spoiler alert: It works! I used the broth I had in the cabinet, which happened to be vegetable broth. Which for no particularly reason I'm going to disclose that I think vegetable broth tastes just dandy but smells really strange. I'll just leave that little fact here for you even though it's of no use to anyone at all.

I could have roasted the broccoli to give it a little oomph in the flavor department, but I rather liked the way this all came together as a one-pot wonder, and letting it cook slowly in the orzo meant that it kept its bright green color and still turned out tender but toothsome.

I think the red onion is a nice pop of color here, but any sort of onion will work just fine; it was just what I had on hand. I added dried crushed red pepper, but for kids or people who prefer a sort of unadulterated mac and cheese, you can leave it out altogether.

When I posted a shot of this on Instagram last night, the response was swift—I think orzo is just one of those universally beloved things. Who could believe it all came together in less than 20 minutes?

Twenty-two minutes if you stop to open a bottle of wine and pour yourself a glass or three. Which I recommend.

Enjoy!

DSC_2869

Cheesy Broccoli and Orzo "Risotto"

6 cups vegetable broth or chicken broth
2 tablespoons olive oil
½ large red onion, chopped
4 garlic cloves, minced
4 cups broccoli florets
¼ teaspoon salt
¼ teaspoon freshly ground black pepper
Dried crushed red pepper (optional)
1½ cups dried orzo
4 ounces shredded Cheddar cheese
¼ cup heavy cream

1. Bring broth to a simmer over medium heat; keep warm over low heat.

2. Heat olive oil in a large, deep skillet over medium heat; add onions and cook, stirring, until onions are translucent. Stir in garlic; cook 1 minute. Stir in broccoli, and sprinkle with salt, black pepper, and red pepper, if desired. Cook 1 minute.

3. Stir orzo into broccoli, and cook 1 to 2 minutes or until lightly toasted. Ladle about ½ cup broth into pan; cook, stirring constantly, until liquid is absorbed. Repeat with remaining broth, and cook 8 to 10 minutes, adding broth ½ cup at a time as needed until orzo is al dente and broccoli is tender.

4. Reduce heat to low, and stir in cheese and cream. Makes 4 servings.

 
0 comments

*spicy cabbage stir fry with panko-crusted chicken.

DSC_2870


Remember those panko-crusted cutlets I made yesterday? There were five of them, and Mama don't waste. (Well, technically Mama does waste, but Mama feels really pretty guilty about it.)

So Chicken week continues!

I really love cabbage for its freshness and crunch and that impression it gives of bearing healthful goodness. I also like that it is really hardy and long-lasting in the refrigerator, which means you can add it to all manner of things—toss sautéed cabbage into egg noodles and serve with Swedish meatballs, tumble it into stir-fries, or make a delicious slaw to top any number of sandwiches, from hot dogs and hamburgers to Reubens and Cubans—even though it comes as a head the size of your ... well, head, which means you'll be eating it in things for a while.

That's where the leftover makeover comes in handy.


DSC_2873

The only cure for leftovers, I find, is to turn them into something completely different whenever possible.

Monday's flavors were sort of (sort of) a Southern American homage, so I swung the pendulum all the way around last night and made a stir fry. You may think it is MORE THAN A LITTLE strange to put cole slaw in a stir fry, but it helps to know that I prefer my cole slaw super lightly dressed. It's not as though this ended up being a typical slaw with just a little soy sauce stirred in. (Because that might be weird. Or good. I don't know!)

DSC_2866

I did some Internet research on the best way to reheat fried chicken, and the Internet said ... don't. Pretty universally, the prevailing wisdom seems to be that if it's easy to screw up reheating fried chicken, and fried chicken tastes delicious cold, then what would be the point?

Still, I assumed that this cold chicken would be best with cold noodles, and because I wasn't attempting that, I gambled with 20 minutes at 325, and it was just right—heated through and re-crisped on the outside, but not dry on the inside.

I plucked a couple of jalapeños out of the slaw before heating it in the pan, just so they'd retain their crunch and heat. I also stirred in some sriracha to amp up the flavor it might have lost by being, well, leftovers.

Et voilà! A hot, delicious weeknight meal that didn't require another trip to the store, or a stop for convenience food, that didn't taste anything like the previous night's weeknight meal.

Enjoy!

DSC_2874

Spicy Cabbage Stir Fry with Panko-crusted Chicken

¼ small head green cabbage, thinly sliced
1 jalapeño, thinly sliced
2 green onions, chopped
3 tablespoons reduced-fat mayonnaise
2 teaspoons yellow mustard
2 teaspoons white wine vinegar
Salt, to taste
Freshly ground black pepper, to taste
2 tablespoons butter
3 tablespoons olive oil, divided
4 chicken cutlets or chicken breast fillets
All-purpose flour
2 eggs, beaten
Panko
1 cup jasmine rice
4 garlic cloves, minced
2 teaspoons dried ginger or minced fresh ginger
¼ cup low-sodium soy sauce
1 tablespoon fish sauce
1 tablespoon rice wine vinegar
Sriracha, to taste
Garnish: chopped green onions

1. Combine first 3 ingredients in a small bowl. Whisk together mayonnaise and next 4 ingredients; add to cabbage mixture, and stir to combine. Chill until ready to serve.

2. Heat butter and 2 tablespoons oil in a large, deep skillet over medium heat until butter melts. Meanwhile, sprinkle chicken with salt and pepper to taste. Dredge chicken in flour; dip in egg, and dredge in panko. Cook chicken in butter mixture 3 to 4 minutes on each side or until golden brown. Remove to paper towels to drain.

3. Bring 2 cups water to a boil in a saucepan; stir in rice. Cover, reduce heat to low, and cook 20 minutes.

4. Meanwhile, heat remaining 1 tablespoon oil in a large skillet over medium-low heat; add garlic and ginger and cook, stirring, 1 minute or until fragrant. Stir in cole slaw, and cook until cabbage is tender.

5. Combine soy sauce, fish sauce, vinegar, and sriracha in a small bowl. Stir cooked rice into cabbage mixture until rice is dry and toasted; stir in soy sauce mixture.

6. Top stir fry with chicken, and garnish, if desired. Makes 4 servings.


0 comments

*buttermilk biscuit chicken sliders with green slaw.

DSC_2866

Sometimes I think my brain is a little like a front-load washing machine—thoughts just kind of tumble around in there, and I never know which one is going to slam into the door like a red sock.

Which is to say that this was inspired by a lot of little things, something of a stream-of-consciousness dinner-planning process. (Scattered and nonsensical! Who, me?)

I don't cook with meat all that much on the Woodside, mostly because it's hard to use it all up before it goes bad if you're a party of one, and I have unhealthy levels of freezer fear. But occasionally I do have a craving, and I like to indulge it when there's something I know I really want. (In this case, chicken; the package I found at the store had five pieces in it, so look for this to be the week o' the bird.) I cooked it my favorite way, which is to say cutlets crusted in panko and pan-fried, a procedure I return to a lot because I find it to be foolproof.

And SPEAKING OF foolproof, I landed on making biscuits because I am a terrible baker and I know that I need practice/confidence, and I found this recipe over at Tracey's Culinary Adventure, and her biscuits are beautiful. Seriously, go look at them. I'll wait. (It's important to the narrative.)

Anything strike you as unusual, when you compare her biscuits to mine?

Yeah, I don't know what happened. I did follow the recipe to the letter, although when my biscuits neither rose nor browned, I thought maybe I'd just leave them in the oven a little longer.

Which was a mistake when I subsequently forgot they were in there and murdered them.

BUT these were a fail for me before I baked them into little hockey pucks, which returns me to my earlier assertion that I am just really very bad at baking.

Still, I live alone and I'm not made of money, so I shrugged off their density and dryness and soldiered on, with a green slaw (cabbage + green onion + jalapeños) and a nice, ripe tomato slice in honor of the shoulder season for Alabama tomatoes.

The slaw was delicious; I chopped up a second chicken breast and another tomato slice and stirred into the cabbage mixture for an at-work lunch today.

DSC_2867

And this morning, before work, I layered a biscuit with Cheddar and tomato and fried egg and sopped up the yolk with the butter bomb and took a slightly strange-looking photo in the slightly strange-looking light of the Woodside kitchen. If you are a better baker than I (and you are, trust), give this one a go, and maybe tell me where you think I went wrong.

Enjoy!

DSC_2878

Buttermilk Biscuit Chicken Sliders with Green Slaw

¼ small head green cabbage, thinly sliced
1 jalapeño, thinly sliced
2 green onions, chopped
3 tablespoons reduced-fat mayonnaise
2 teaspoons yellow mustard
2 teaspoons white wine vinegar
Salt, to taste
Freshly ground black pepper, to taste
9 oz (about 2 cups) all-purpose flour
2½ teaspoons baking powder
½ teaspoon salt
5 tablespoons cold unsalted butter, cut into small cubes
¾ cup cold buttermilk
3 tablespoons honey
2 tablespoons olive oil
2 tablespoons butter
5 chicken cutlets or chicken breast fillets
All-purpose flour
2 eggs, beaten
Panko
1 tomato, sliced

1. Combine first 3 ingredients in a small bowl. Whisk together mayonnaise and next 4 ingredients; add to cabbage mixture, and stir to combine. Chill until ready to serve. 

2. Preheat oven to 400 degrees. Line a baking sheet with parchment paper.

3. In a large bowl, whisk together the flour, baking powder, and salt. Add butter cubes, and use a pastry cutter (or your fingertips) to cut in the butter until the pieces are no bigger than peas. (The mixture should resemble coarse meal.) Place bowl in refrigerator; chill 10 minutes.

4. Meanwhile, whisk together the buttermilk and honey in a measuring cup. Add to flour mixture, and stir gently just until  dry ingredients are moistened.

5. Turn dough out onto a lightly floured surface, and knead gently 3 to 4 times to bring it together. (The dough may still be a little crumbly.) Roll dough into a 9- x 5-inch rectangle about ½ inch thick. Fold dough into thirds like a business letter. Roll dough again into a 9- x 5-inch rectangle about ½ inch thick, and again fold it into thirds like a letter. Roll dough out a third time to ¾ inch thick. Using a 1¾-inch round cutter, cut biscuits from dough, and place about 1 inch apart on prepared baking sheet.

6. Bake 11 to 12 minutes, or until biscuits rise and tops are golden brown. Transfer to a wire rack to cool.

7. Heat butter and oil in a large, deep skillet over medium heat until butter melts. Meanwhile, sprinkle chicken with salt and pepper to taste. Dredge chicken in flour; dip in egg, and dredge in panko. Cook chicken in butter mixture 3 to 4 minutes on each side or until golden brown. Remove to paper towels to drain.

8. Cut chicken cutlets in half crosswise. Slice biscuits in half horizontally, and layer with chicken, slaw, and tomato slices. Makes 6 to 8 servings. 

 
2 comments

*stovetop red beans and rice with pimiento cheese.

9592364892_70f61fa43d_o

Look at that teeny tiny skillet! Isn't she terrific? She's one of a short stack of cast iron pans of varying sizes (including an awesome griddle pan) that my grandmother gave me. They sit in the corner of my kitchen unused for the most part, because they're beautifully seasoned and I'm terrified of ruining them somehow. As a rule I get about halfway through the instructions for seasoning cast iron and think, "Nope! Definitely would screw that up!" and hope my sweet gramma isn't somewhere rolling her eyes at me.

She is definitely somewhere rolling her eyes at me.

A couple of weeks ago I went to a friend's house to watch Breaking Bad. (Because from a television standpoint it's the best thing this side of The Golden Girls—only, you know, with harder drugs. Rose only went to rehab because she was addicted to muscle relaxers.) I never think much about other people cooking for me because I so enjoy being the cook-er that I rarely considering being the cooked-for. But Julie made this amazing, can't-get-it-off-my-mind red beans and rice. It was perfectly spicy, and the texture was spot on: creamy and smooth but chock-full of beans (yum) and Cajun sausage (double yum).

Red beans and rice is the kind of dish that hits you in all the right comfort food spots—it's akin to a casserole, which wins because it has that little-bit-of-everything feel. In this case, there is thick, starchy broth, bright heat, meaty bits, and fragrant carbs.

I do believe that's everything. 

9589598601_77f3edea4c_o

Julie made hers in a slow cooker, and trust me when I tell you that's the ideal way to go. But if you are like me and have fewer mouths to feed and an inability to think beyond five minutes from whatever time it is, this is an easy one to simmer on your stovetop and come out with a delicious weeknight facsimile. You also get the benefit of browning off the sausage, which I love because it gives it a crispy exterior that's a lovely contrast to the rice and beans.

One thing Julie did that I forgot to do but highly suggest, is to mash up some of the beans. This thickens and silkifies (sure, could be a word) the "stew" part of the mix but leaves whole beans, too, for stick-to-your-ribs toothsomeness.

One thing Julie did NOT do but that I also highly suggest, is to top the whole thing off with a sensible (ahem) dollop of pimiento cheese.

9592453982_0937f74104_o

It was mentioned to me that this could be considered "weird," but try it try it try it I promise it's a lovely marriage. Think of it as putting cheese on your chili, but then remember that this mixture introduces a vinegary tang from the pimientos. I scooped it out when it was well chilled, so that it slowly melted into the beans and became sort of a cheesy surprise in every bite.

The easiest way to accomplish this feat of strangeness is to use your favorite prepared pimiento cheese, but please make sure it was made by hands that freshly grated it, if you can. Store-bought pimiento cheese probably isn't going to give you the same payoff as the more artisan variety. (This here was given to me by my sister-in-law, who purchased it from a local vegetarian restaurant/dive bar in town. It was just right.)

So here's to being weird!

OK, that's enough eye-rolling, Grandma.

Enjoy!

9589631669_5138a7d2f9_o

Stovetop Red Beans and Rice with Pimiento Cheese

1 tablespoon olive oil
6 ounces andouille sausage
1 small green bell pepper, diced
½ medium onion, diced
½ teaspoon kosher salt
½ teaspoon black pepper
¾ teaspoon cayenne pepper
1 tablespoon cajun seasoning
3 cups fat-free, low-sodium chicken broth
1 (8-ounce) can tomato sauce
2 (16-ounce) cans low-sodium kidney beans, drained and rinsed
Hot cooked rice
Prepared pimiento cheese
Garnish: chopped green onions

1. Heat olive oil in a stockpot over medium heat. Add sausage; cook 5 minutes or until well browned. Remove sausage from pot with a slotted spoon, reserving drippings in pot. Stir in bell pepper and onion; cook until vegetables are softened. Stir in salt and next 3 ingredients; cook 1 minute or until spices are fragrant. Add chicken brought and tomato sauce, stirring to loosen browned bits from bottom of pot. Stir in beans; cover, reduce heat, and simmer 20 minutes.

2. Bring mixture to a boil and cook, uncovered, 20 more minutes or until liquid is slightly thickened. Stir in sausage, and cook until heated through.

3. Divide rice among serving bowls; top with bean mixture, and dollop with pimiento cheese. Garnish, if desired. Makes 4 to 6 servings.

 
0 comments

*chicken burgers with avocado-tomatillo sauce.

DSC_2880

It's a brilliantly cool August Saturday in Alabama (what?), and I'm sitting on the couch watching Ina make grilled cheese sandwiches. "I've got just a very simple Pullman loaf ... Good bakery loaf—not, like, the stuff from the grocery store."

She's the most cheerful snob I know.

I have always loved my neighborhood Winn-Dixie grocery store, thank you very much, but I have to admit that when it underwent a floor-to-ceiling overhaul about a year ago, I wasn't terribly thrilled. I didn't want to lose the great Asian food stocks, my treasured self-checkout lanes (no human interaction! my favorite!), and my beloved solitude (a theme develops). I was quite often, at any time of day, absolutely the only person in there, which may tell you a little something about why the powers that be at the W-D decided the place needed a spruce-up in the first place. Everyone was flocking to Publix, that vast wasteland of crowded produce sections and employees too intensely fascinated with WHAT ARE YOU MAKING WITH THIS?, and that was A-OK by me. More quiet browsing for me around the corner. The Winn-Dixie aisles became my hallowed library halls.

But when the store decided it just had to bring itself into this decade, I was nervous. Our relationship was going so well; why did things have to change??

Like any good stubborn person, I found that the results were just (SNIFF!) as I expected. The parking lot began to fill, nobody ever stocked the fish sauce, and why in the world was the bread aisle now frozen-section-adjacent?

But over time, I've come around. (And it only took a year! Who's flexible and easygoing?) For one thing, the self-checkout remains, so I didn't have to entertain a deal breaker. For another, I've recently discovered the benefits of having access to an honest-to-god bakery. (Yes, Ina, in my grocery store.)

If there's one thing you should know about me, besides that I can write six or seven paragraphs in praise of supermarkets, it's that I am not a person who should keep bread in the house. If I have bread, and I have cheese, and (god forbid) I have mayonnaise, things can go pretty chubby pretty fast.

My people are from the Midwest. Bread and cheese run through my veins. (Probably literally.)

But the terrific thing about the Winn-Dixie having a bakery is that I can purchase only the amount of bread a normal person should eat in one sitting at a time. This here is a Portuguese roll, and it cost (no lie) 39 cents.

It's been a little light on the meat around the Woodside here lately, which is just fine with me—eating vegetarian, even sort of accidentally, is healthy and cheap, and I am just not a person who misses the meat when there are beans and eggs and cheese to be had.

But every once in a while I do hear my body say BIG DOSE OF PROTEIN, PLEASE and it's insistent that tofu or quinoa is not the proper vehicle. In this case I used ground chicken, mostly because I wanted that cooked-through texture. I really wanted to bite into something meaty. The tomato is a little bit of an affront to the state of Alabama, but I may have chosen it too hastily. It was certainly not the valedictorian of the 2013 summer semester.

The whole shebang, though, is mostly about that chunky avocado-tomatillo sauce. It soaks into the toasty bread (please please toast the bread next to the burger as it finishes) and makes an ordinary weeknight chicken burger something to look forward to.

I got off work the night I made this at 7:45 and spent a happy little decompressing half hour or so in the kitchen putting this together—there's no rocket science here, just a lovely sandwich dinner that will help you forget you worked until 7:45.

The citrus in the sauce is the wild card here—you want the avocado and cilantro to give it good balance, so it's good to get a nice, big, ripe avocado and add the lime juice a bit at a time, tasting until it's as tangy as you like—tomatillos can be unpredictable. I like it on the creamier side, so if your avocado isn't pulling its weight you can stir in a glug of sour cream or (ahem) ranch dressing. (I won't tell.)

Enjoy!

DSC_2868

Chicken Burgers with Avocado-Tomatillo Sauce

1 pound ground chicken
1 teaspoon garlic salt
¾ teaspoon black pepper
4 Portuguese rolls, kaiser rolls, or hamburger buns, halved
4 tomato slices
4 red onion slices
Avocado-Tomatillo Sauce (recipe below)

1. Combine chicken, garlic salt, and black pepper in a medium bowl. Divide mixture into four equal portions, and form into thin patties.

2. Cook chicken patties in a greased grill pan over medium heat 6 to 8 minutes on each side or until completely cooked through. During last minute of cooking, place rolls, cut sides down, on grill pan to toast.

3. Top toasted rolls with tomato slices, onion slices, and Avocado-Tomatillo Sauce. Makes 4 servings.

Avocado-Tomatillo Sauce

5 medium tomatillos, husks removed and scrubbed
¼ small red onion, chopped
1 garlic clove
1 jalapeño, seeded and chopped
½ cup fresh cilantro
1 tablespoon fresh lime juice
1 large avocado, chopped
¾ teaspoon kosher salt

1. Chop tomatillos, and place in a food processor. Add red onion and next 4 ingredients; pulse until coarsely chopped.

2. Add avocado and salt; pulse until smooth. Makes 1½ cups.

 
0 comments

*pasta with fresh tomato sauce and 6-minute egg.

DSC_2875

A couple of weeks ago I cleaned out the condiments in my refrigerator door. Well that's not entirely true; I weeded out just the salad dressings because I am only one woman and I certainly do not have the time to wade through every sticky bottle of mustard, curry paste, fish sauce, mayonnaise, soy sauce, and heaven only knows what else in a single evening.

I should note that of the eight bottles of salad dressing in my refrigerator, only one passed the expiration date test. One that ended up in the bin had not even been opened.

Shame. I feel shame.

The good news is that now I can just indiscriminately sweep the whole lot into the garbage, because come a-summertime, this raw tomato sauce is the only condiment I need.

All of the ingredients go into the food processor, which means that it takes 4 minutes to make. I've been eating it on EVERYTHING this week. Breakfast is crostini cut from a whole-grain baguette topped with melty mozzarella and scrambled eggs. Know what tastes great slathered all over that? This sauce.

DSC_2868

Noodles sprinkled with fresh basil and topped with a beautiful, sunny 6-minute egg. Know what tastes great with that? This sauce.

The last time I made this sauce it was as an accompaniment to meatloaf, but none of the sauce actually made it to the table, because my family couldn't keep their focaccia-dipping fingers out of it. 

A long slab of crusty bread, a hunk of Parmesan, and this sauce will make you the most popular person at your next potluck.

DSC_2870

It's very close to what Giada de Laurentiis taught me is "checca sauce," although naturally I had to make some adjustments for my own taste and the quantities available in my market.

Garlic is a heavy-hitter here, so I'd start with 1 or 2 cloves and then taste to see if it's to your liking. (Personally I like my raw garlic levels somewhere around vampire-killing potency, but that's not for everyone.) Throw in a little dried crushed red pepper if you want things spicy, but even I of the five-alarm taste buds didn't need it here.

Please do try a 6-minute egg when you can. It's the perfect marriage of sunny-side up and hardboiled, although my hardboiled eggs don't turn out this beautifully. (Thank you, Rachael Ray.) The whites are totally cooked, but the yolk stays velvety and runny.

I feel the need to point out that when you are a single lady with a dozen eggs, you are going to find yourself putting eggs on top of a lot of foodstuffs. (You are also going to find yourself opening your spaghetti canister to find that it only has soba noodles in it, but that's another story for another day.) I promise this won't become the Egg on Top Chronicles forever.

Use all those beautiful, perfect, late-summer tomatoes while you can!

Enjoy!

DSC_2876

Pasta with Fresh Tomato Sauce and 6-Minute Egg

2 ounces spaghetti or other long pasta
1 egg, at room temperature
Kosher salt, to taste
½ cup Fresh Tomato Sauce (recipe below)
Garnish: fresh basil

1. Cook pasta according to package directions; drain and set aside.

2. Fill a large bowl two-thirds full with ice, and place in the freezer. Bring a medium saucepan half filled with water to a rolling boil over high heat; carefully lower egg into boiling water. Cook egg 6 minutes. With 1 minute remaining in egg cook time, remove bowl of ice from freezer and fill bowl with water. Transfer egg to ice bath with a slotted spoon, let cool, and carefully peel.

3. Transfer hot cooked noodles to a plate, and sprinkle with kosher salt and black pepper to taste. Top with Checca Sauce and egg. Sprinkle egg with additional kosher salt. Garnish, if desired. Makes 1 serving.

Fresh Tomato Sauce

1 pound tomatoes, coarsely chopped
1 bunch green onion (white and pale green parts only), coarsely chopped
2 to 4 garlic cloves, chopped
10 fresh basil leaves
3 tablespoons olive oil
Kosher salt, to taste
Black pepper, to taste

Place first 5 ingredients in a food processor; pulse until coarsely chopped. Stir in kosher salt and black pepper to taste. Makes 2 cups.


0 comments

*TEA (tomato, egg, and avocado) breakfast sandwiches.

DSC_2878

This is what I've been eating for breakfast this week, which is mostly notable because I'm actually willing to wake up earlier in the morning to prepare it.

Anyone who knows me knows it takes a forklift to get me out of bed on an average weekday morning, because I like to stay up late watching four (two-hour) episodes in a row of MasterChef while yelling at the TV about how much I am not enjoying watching MasterChef this season.

(It's a misnomer anyway, right? The premise is that these are home cooks? I don't think making very bad eclairs while Joe Bastianich raises his eyebrow at you really promotes you to the level of "master." Anyone competing on Top Chef Masters might agree with me.)

But! For this breakfast I am willing to make the sacrifice. The dog, however, stays firmly tucked into the covers until I crowbar his tiny butt out of bed, because don't nobody want to be outside, in August, in Alabama. It's slightly difficult to tell in the picture below, but those eggs are sweating like a whore in church. And I had to do quite a bit of work to these pictures to eliminate the curtain of fog that settled contentedly onto my camera lens.

A nice, hearty bread works best here, for the sopping up of lovely yolkiness. Cautionary tale, though: You would be wise to invest in full-fat Cheddar. I thought reduced-fat would make me somehow virtuous, but it came out slightly rubbery and flavorless. Do as I say, not as I do.

One thing I've learned along the way is that after the first day with your avocado, when you've put the remainder in the fridge, it's good to place the avocado on the bread and layer the cheese over it, so that the short toast in the oven takes the chill off. To season the avocado I use garlic salt with flecks of dried parsley in it for a little extra oomph, but regular s&p will do just fine—you don't all have to be as fancee as we are here on the Woodside.

I serve this up with a side of berries (because my mother tells me they'll keep me from dying) and curl into the couch in my robe while my hair dries, checking the weather forecast (dog in yard or in house?) and listening to Morning Edition.

So there you have it! Now you know how to make a fast and delicious breakfast sandwich, and way too many details about my mornings.

Enjoy! 

DSC_2870

TEA (Tomato, Egg, and Avocado) Breakfast Sandwiches

4 slices whole wheat bread
4 slices Cheddar cheese
1 avocado, sliced
Garlic salt
1 tomato, sliced
Cooking spray
4 eggs

1. Preheat oven to 500 degrees. Place bread slices in a toaster oven and toast just until golden brown. Place toasted bread on a baking sheet, and top with cheese slices. Bake just until cheese melts.

2. Top cheese with avocado slices. Sprinkle with garlic salt, and top with tomato slices.

3. Cook eggs in a skillet coated with cooking spray until whites are set and yolk is still runny. Top tomato slices with eggs. Makes 4 servings.


search.

foodgawker

my foodgawker gallery

archive.

followers.

I am a work in progress. I perpetually need a hair cut. I'm totally devoted to my remarkable nieces and nephew. I am an elementary home cook and a magazine worker bee. (Please criticize my syntax and spelling in the comments.) I think my dog is hilarious. I like chicken and spicy things. I have difficulty being a grown-up. Left to my own devices, I will eat enormous amounts of cheese snacks of all kinds.

.